-
Articles

- Archived Articles
Yearbook Article Template
- Details
- Jackie Riddel
ALSO, See staff pages for instructions about different staff layouts -- does not include Joel's Grid layout - November 20, 2022
Spreadsheet: no special class or bio
Spreadsheet: div tag, teacherbox class
<div class="teacherbox">
<div style="text-align: center;"><a href="/XXXXXX"><img style="display: block; margin-left: auto; margin-right: auto;" src="/images/stories/staff/image-coming-soon.png" alt="" /></a></div>
<div style="text-align: center;"><p style="text-align: center;"><strong><a href="/XXXXX">Name of Person</a><a href="/XXX"><br /></a></strong><em>Grade or Title<br /></em><em>EXT. <br /></em><a href="mailto:EMAILADDRESS" target="_blank" rel="noopener noreferrer">EMAIL ADDRESS<br /></a><a class="button" href="/faculty-staff/ID"> Teacher's Bio</a></p></div>
</div>
<hr id="system-readmore" />
<p> </p>
The Div tag spreadsheet will generate and image file path for staff images. If you don't rename the images inthe same nomenclature as noted below or in the HTML copied from the sheet before uploading to the image manager, be sure to remove the broken image from the article when adding new articles.
<div class="teacherbox">
<div style="text-align: center;"><a target="_blank" href="mailto:This email address is being protected from spambots. You need JavaScript enabled to view it."><img style="display: block; margin-left: auto; margin-right: auto;" src="/images/stories/staff/deckerman.jpg" alt="" /></a></div>
<div style="text-align: center;"><p style="text-align: center;"><strong><a target="_blank" href="mailto:This email address is being protected from spambots. You need JavaScript enabled to view it.">Dakota Eckerman</a></strong><br /><em>Parish Specialist</em><br /><a href="tel:3163134820">316-313-4820<br/><a target="_blank" href="mailto:This email address is being protected from spambots. You need JavaScript enabled to view it.">This email address is being protected from spambots. You need JavaScript enabled to view it.</a><br /><a class="button" href="/school-about/faculty-staff/ID"> Teacher's Bio</a></p>
</div>
</div><hr id="system-readmore" /><p> </p>
This email address is being protected from spambots. You need JavaScript enabled to view it.
Parish Specialist
316-313-4820
This email address is being protected from spambots. You need JavaScript enabled to view it.
Teacher's Bio
Set up Instructions for Spanish Pages
- Details
- Jackie Riddel
https://sjs-houston.solutiosoftware.com/en/sponsors-list/sponsor-this-site
Prices 4.21.2023
| Basic | Bronze | Silver | Gold | Platinum |
| $365.00 | $435.00 | $520.00 | $650.00 | $895.00 |
Be sure /es-sponsorship-options still exists as its own menu item at the end of all this. (single article menu item)
Make the tabs on the Sponsor This Site page like SJS-Houston
- make two categories (if they are not already there)
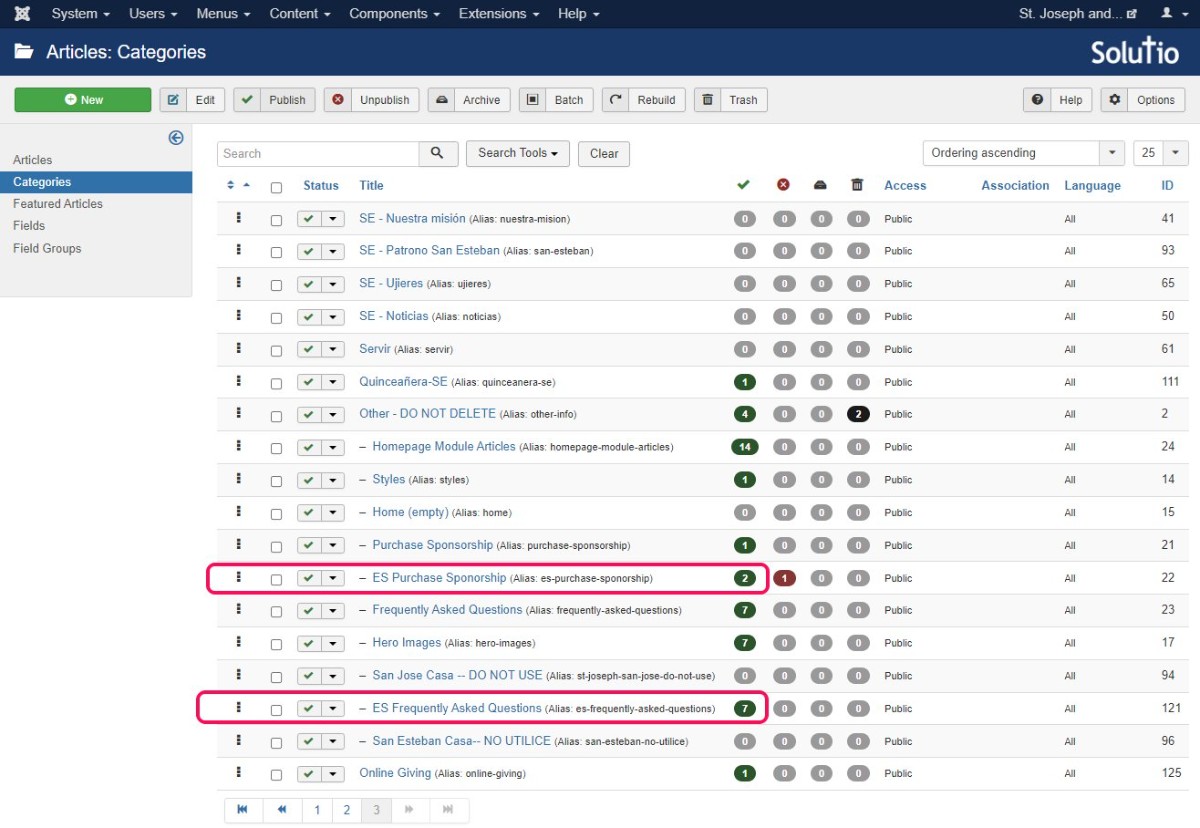
- ES Purchase Sponsorship (alias and path: other-info/es-purchase-sponsorship)
- ES Sponsorship FAQ (alias and path: other-info/es-sponsorship-faq) --> ESFAQ-Category.csv
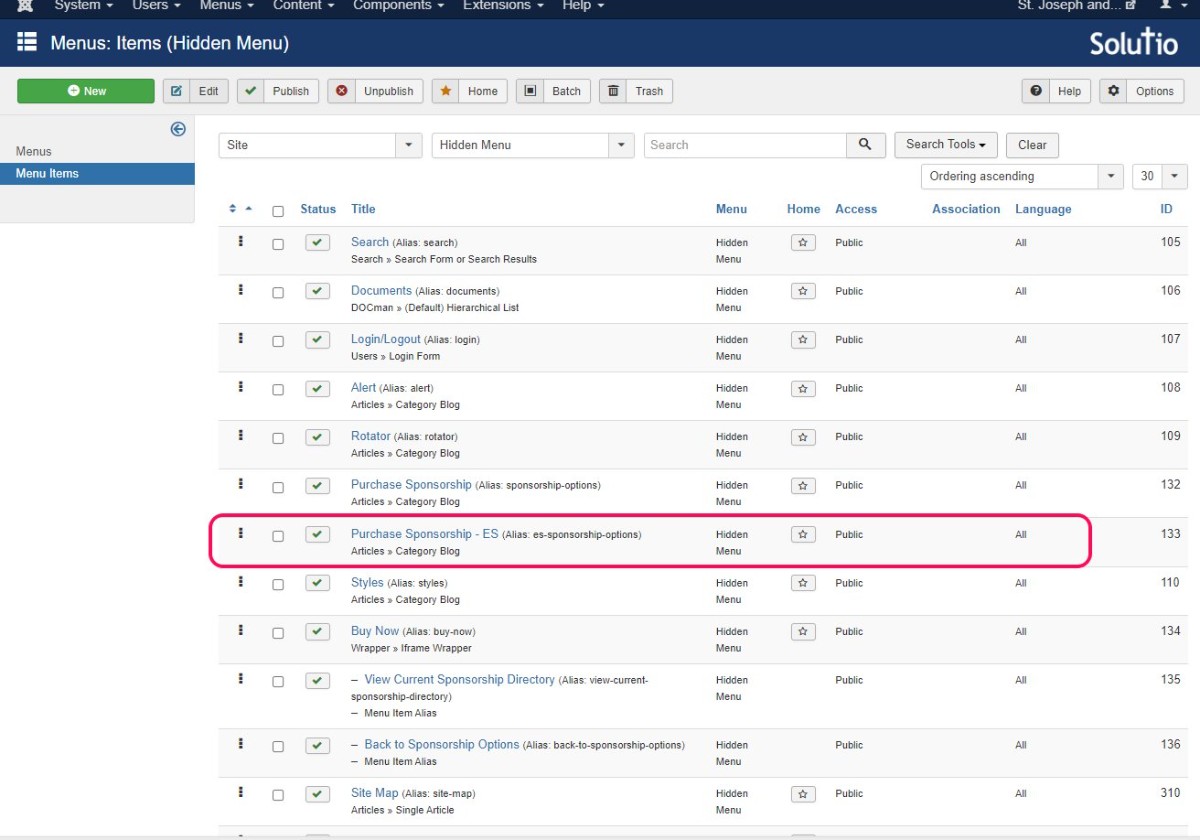
Make Menu Item(s) on the Hidden Menu (need needed with the tabs set up)
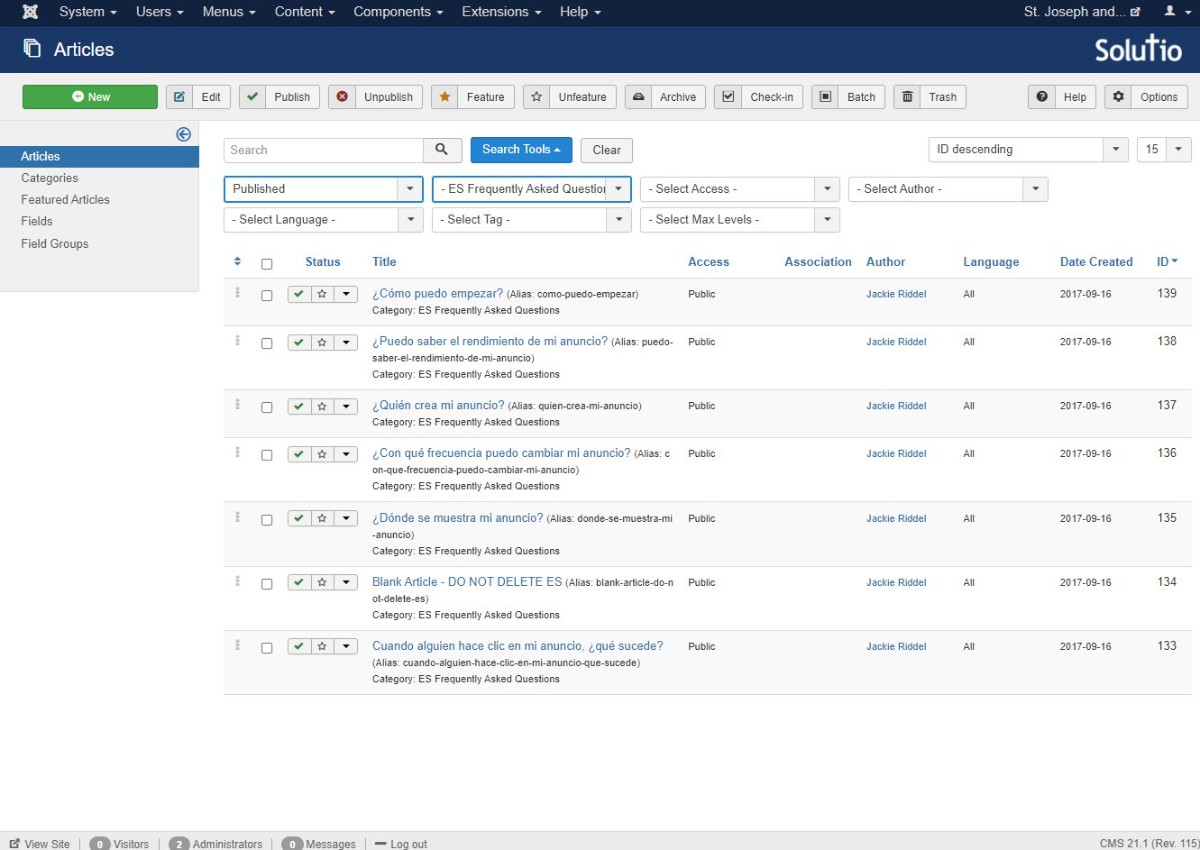
Make FAQ articles is ES FAQ category. Include the Do Not Delete Blank Article
Google Sheet: https://docs.google.com/spreadsheets/d/1_YQokL8TULweXAE7OT2pFr5Bsa1yjlgOvzXjr_b1f3M/edit?usp=sharing
This CSV is located at: \Dropbox\Web\ESFAQarticles --> ESFAQarticleImport.csv
Make Modules - Can Copy the English FAQ Table module
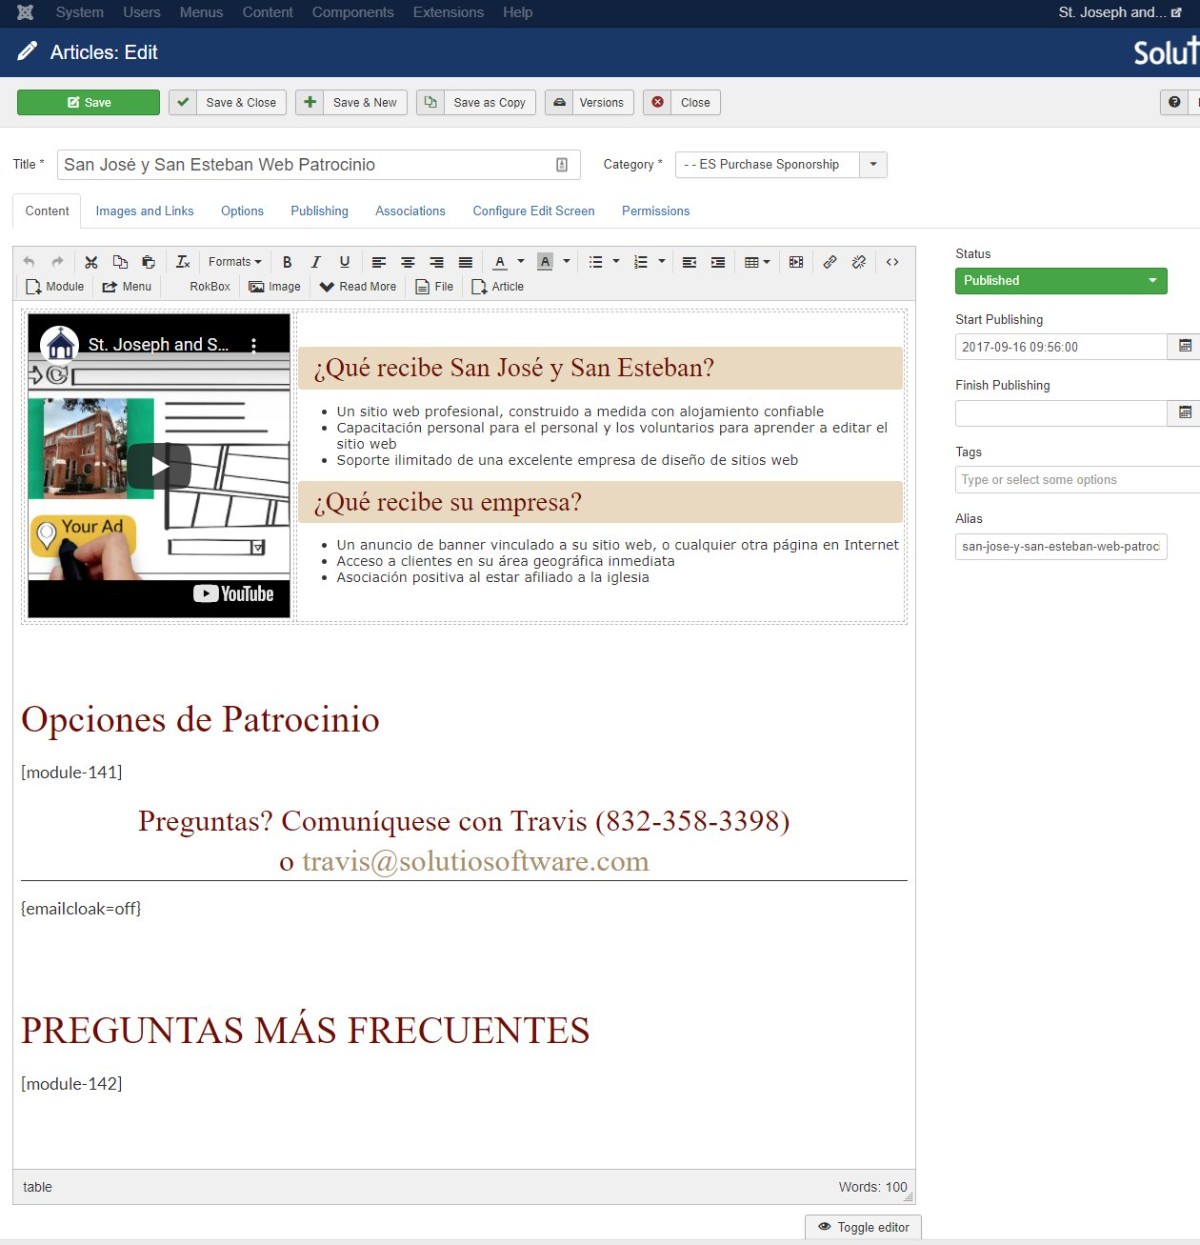
Opciones de Patrocinio (Sponsorship Options)
PREGUNTAS MÁS FRECUENTES (frequently asked questions)
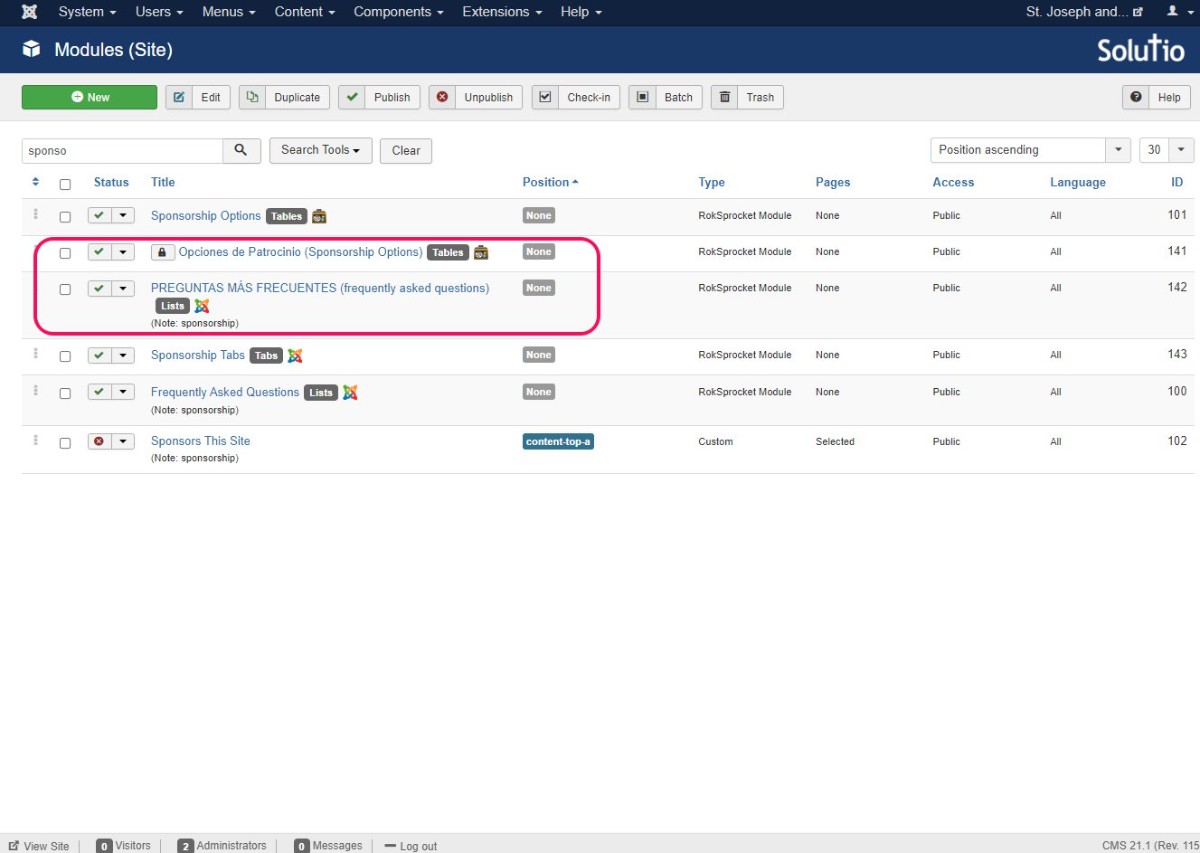
FAQ module below:

Aiden was working in the Tables one so I didn't kick him out to get a screenshot.
Make Sponsorship Option Article
<table class="equaltable">
<tbody>
<tr>
<td><iframe width="100%" height="315" src="https://www.youtube.com/embed/qyOQDHBkbrE?rel=0&controls=0&showinfo=0" frameborder="0" allowfullscreen="allowfullscreen"></iframe></td>
<td>
<h4>¿Qué recibe San José y San Esteban?</h4>
<ul>
<li>Un sitio web profesional, construido a medida con alojamiento confiable</li>
<li>Capacitación personal para el personal y los voluntarios para aprender a editar el sitio web</li>
<li>Soporte ilimitado de una excelente empresa de diseño de sitios web</li>
</ul>
<h4>¿Qué recibe su empresa?</h4>
<ul>
<li>Un anuncio de banner vinculado a su sitio web, o cualquier otra página en Internet</li>
<li>Acceso a clientes en su área geográfica inmediata</li>
<li>Asociación positiva al estar afiliado a la iglesia</li>
</ul>
</td>
</tr>
</tbody>
</table>
<div style="height: 60px;"> </div>
<h1 class="rt-center">Opciones de Patrocinio</h1>
<p>[module-XXXX]</p>
<h2 style="text-align: center;">Preguntas? Comuníquese con Travis (832-358-3398) o <a href="mailto:travis@solutiosoftware.com" target="_blank" rel="noopener noreferrer">travis@solutiosoftware.com</a></h2>
<p></p>
<div style="height: 60px;"> </div>
<h1 class="rt-center">PREGUNTAS MÁS FRECUENTES</h1>
<p>[module-XXXX]</p>
For now, the video is still going to be in English....
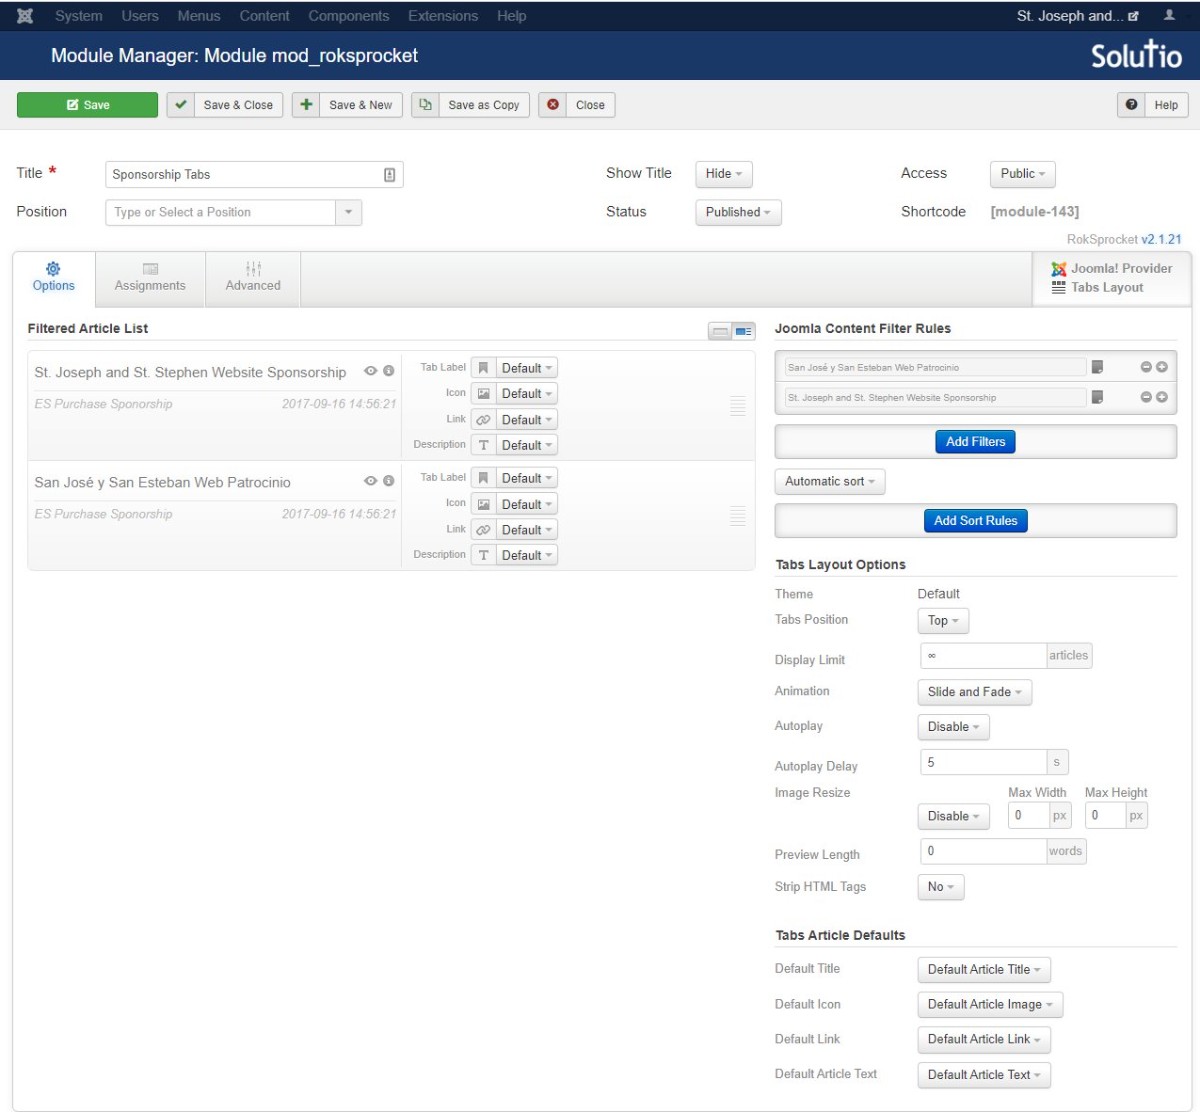
Make Tabs module, with the English and Spanish Sponsorship Option articles.
Finally, make the Sponsor This Site! / Patrocina este sitio article
add the tabs module [module-xxx] in the article body
This should be the only article in this category.
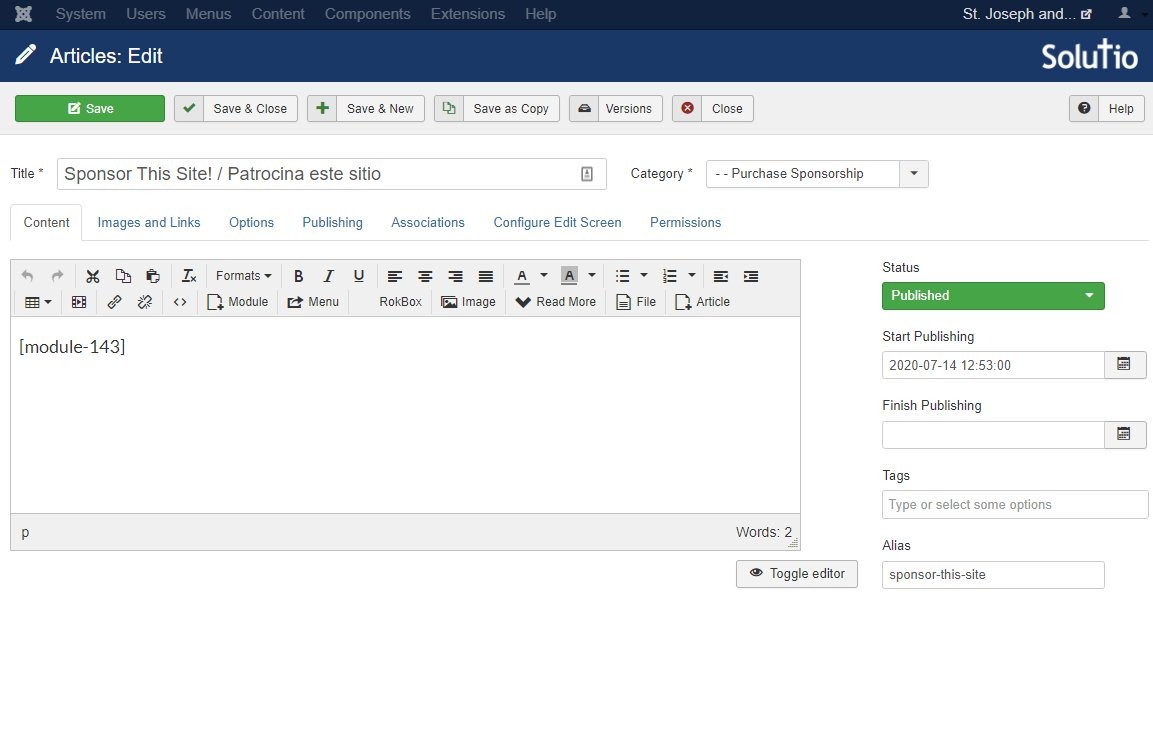
Check the /sponsors-list/sponsor-this-site page
If the tabs are not distinct enough, as a CSS'er to take a look, make em more noticable.

Menu Classes
- Details
- Tori Schippers
Menu Class: search-page
adjusts the colors of the buttons and pagination to match the site colors
Menu Class: sponsorshippage
for all sponsorship pages
Menu Class: ministrypage img-title
Menu Class: ministrypage
Menu Class: newslayout
makes image smaller on news page
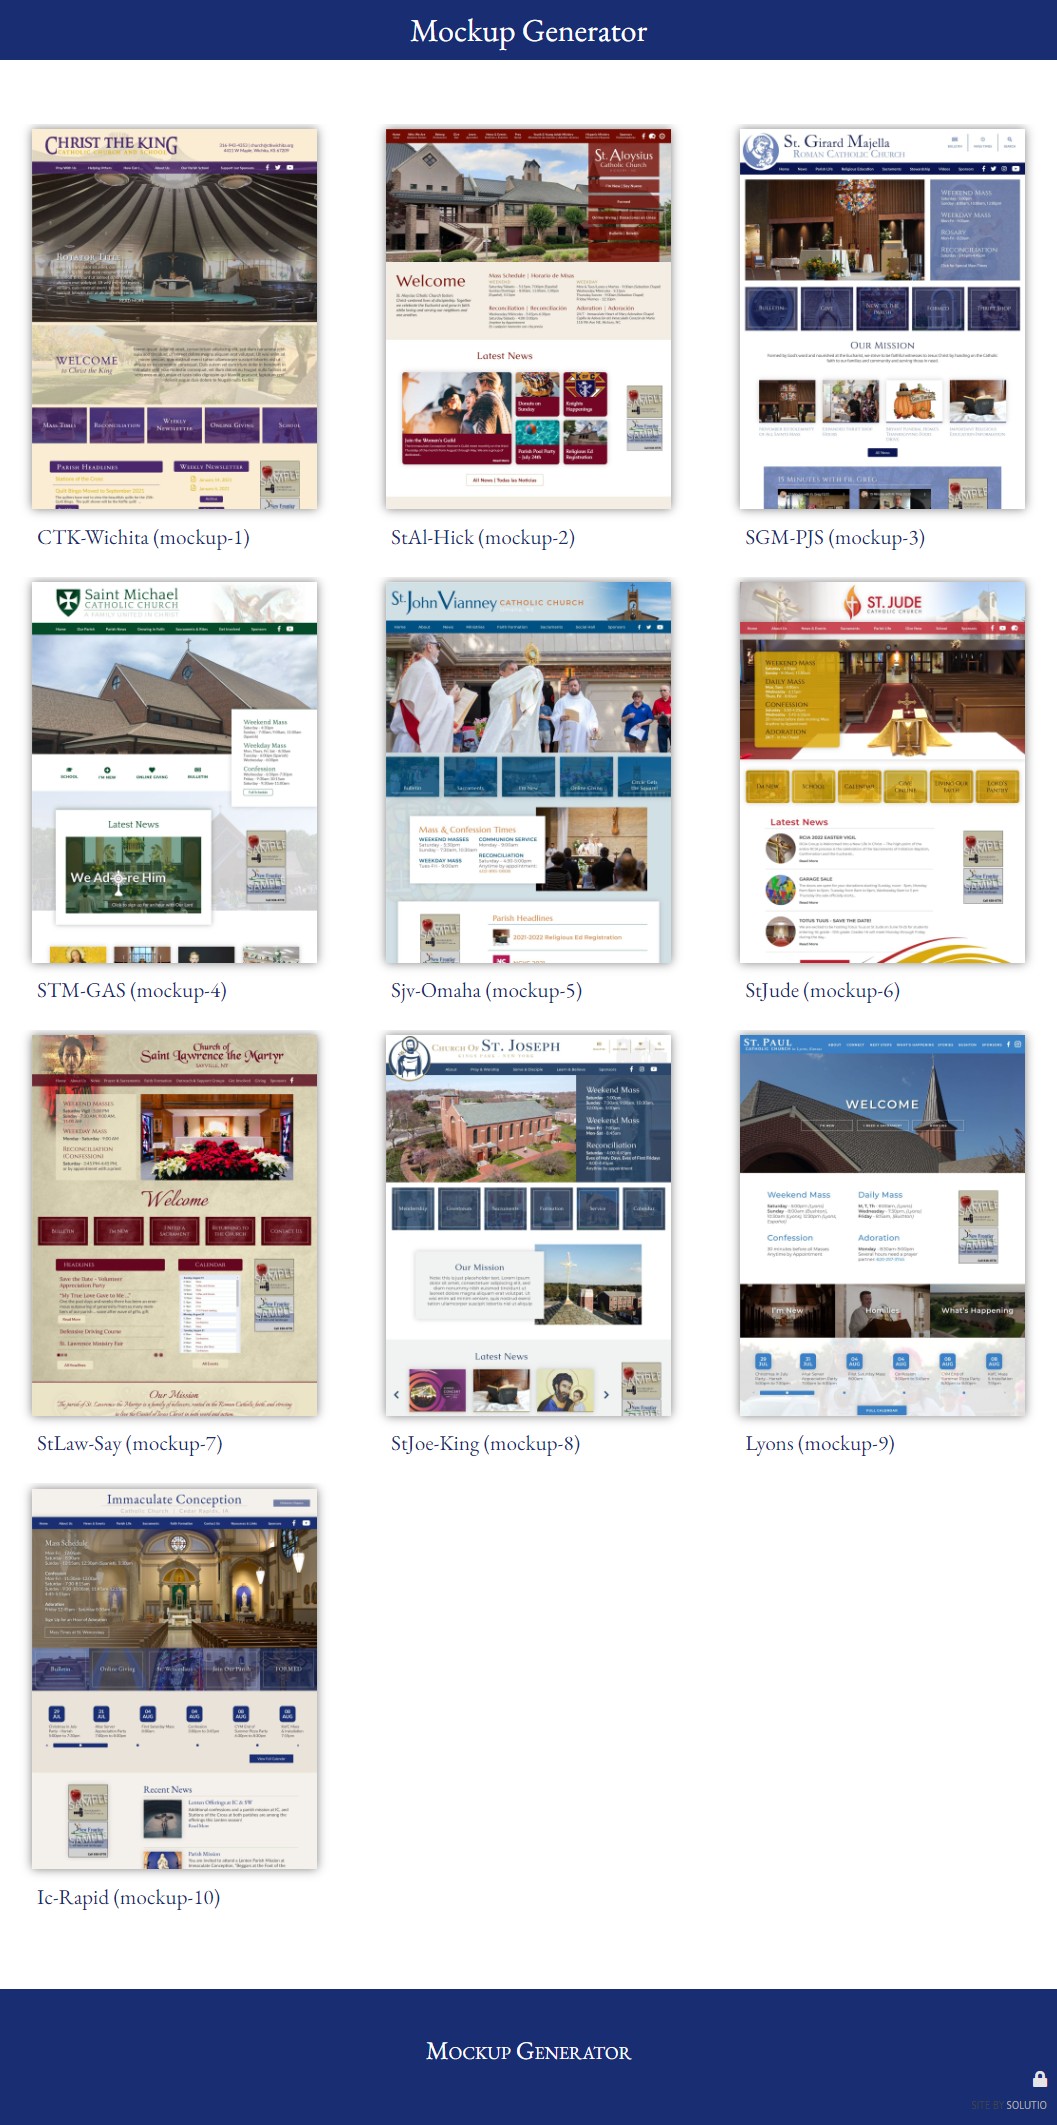
Mockup Generator
- Details
- Jackie Riddel
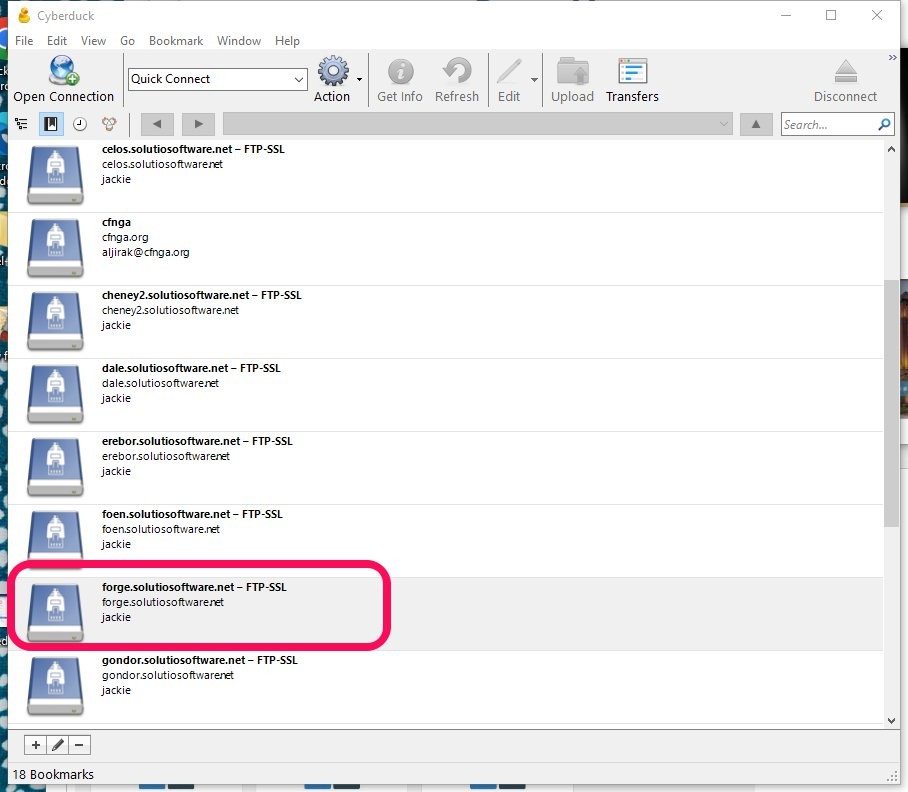
1) Clone the mockup-generator in forge. Use site-code-mockup for the nomenclature of the name
https://forge.solutiosoftware.com/
https://saa-flu-mockup.forge.solutiosoftware.com/administrator
https://sta-hempstead-mockup.forge.solutiosoftware.com/administrator
https://stc-sickler-mockup.forge.solutiosoftware.com/administrator
https://stjoe-babylon-mockup.forge.solutiosoftware.com/administrator
https://stmary-davey-mockup.forge.solutiosoftware.com/administrator
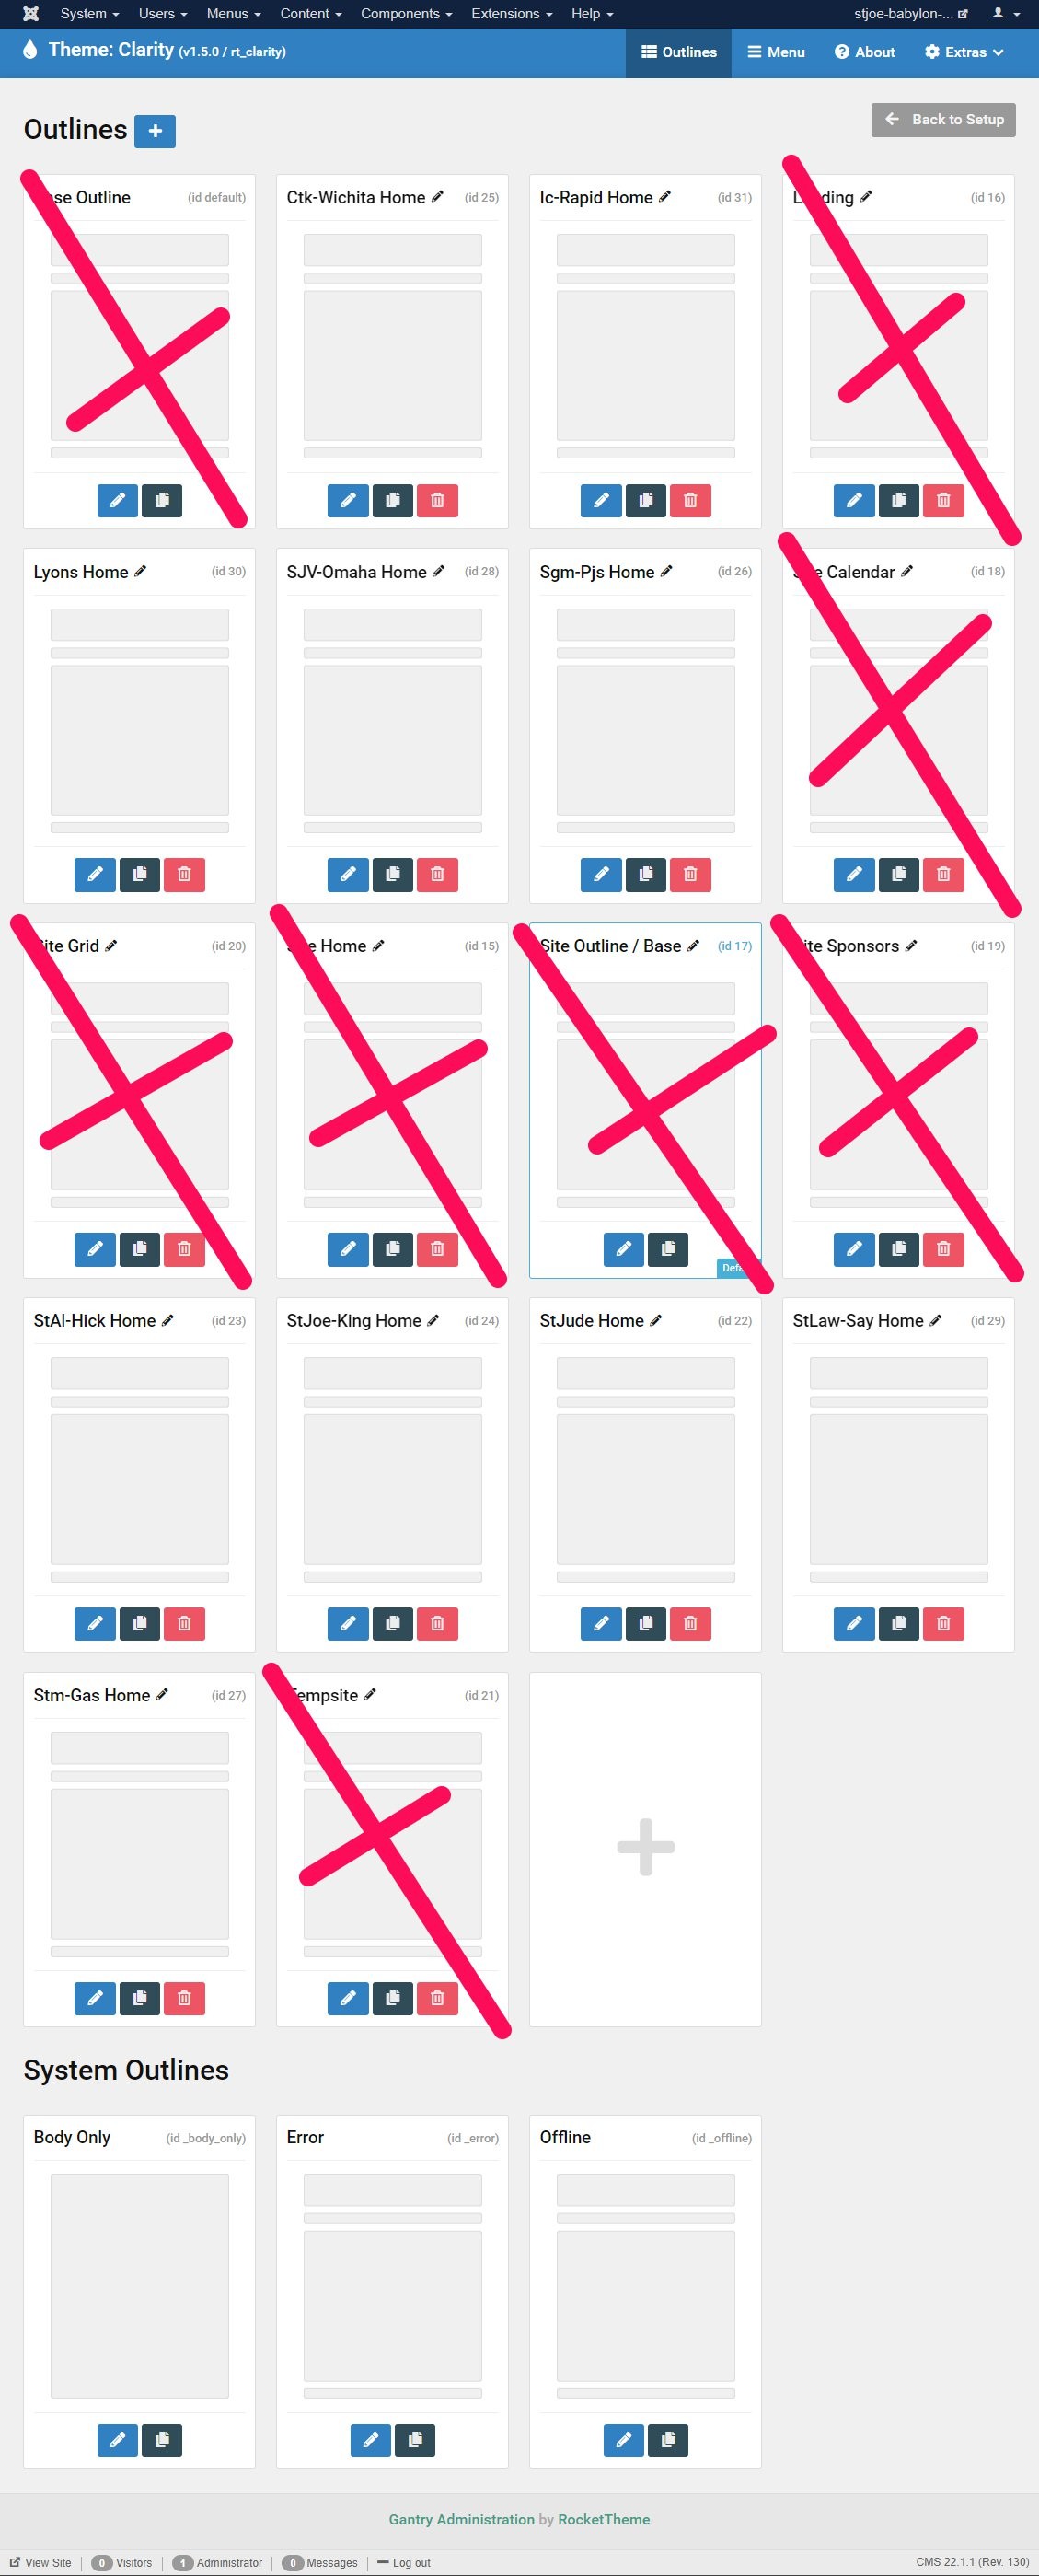
2) Select which style of the 10 prebuilt templates matches the wireframe / consultation notes.
3) Visit the Outlines Screen and edit that style:
4) Upload pictures and logo files, etc from the clients dropbox. Resize as needed.
i.e. if you rename images to the same as the defaults before uploading, there will be less replacing in the build.
logo.png
rotator1.jpg, rotator2.jpg, rotator3.jpg
--make sure to save those images in the clients images created folder in dropbox -- in the mockup folder..
may have to make a logo -- -
logo does not have to be a google font since it will be an image, not actual text
play around with mixed case, all caps, small caps, letter spacing, etc.
try making the logo file between 600x100 and 1000x250 px
some will be uploaded through the image manager, others in the template folder in images (above root - stories) in cyberduck
determine and select color scheme(s) -- may have multiple, document
https://rgbacolorpicker.com/hex-to-rgba
https://chrome.google.com/webstore/detail/colorpick-eyedropper/ohcpnigalekghcmgcdcenkpelffpdolg
5) Update the articles (Mass Times - make the headlines be news from their bulletin),
6) Build out the outline -- update the current. Disabling, don't delete
7) Fonts: https://fonts.google.com/
Commonly used fonts (not limited to these)
body fonts: Lato, Montserrat, Lora,
8) Use gofullpage screen capture browser extension to take a full page screenshot
Images to Create for Mockups
Logo
1600px wide - the height will depend on what you create!
-Please save as both PNG and as design file: could be SVG, EPS, AI (adobe illustrator)
- desktop version
- mobile version if desktop version is fairly wide
- logo-icon.png - save the icon of the logo without the text, if applicable
Rotators (JPG)
1600x669 (superwide)
1600x900 (wide)
- (either or both dimension to suite the design)
Quicklinks
Paralax
News
default-news
default-grid
(JPG) 1600x1200 (standard) - tends to work well for most other ratios when changed, can be resized for actual site for QL's and News
default-hero (JPG) - 1600x444
Apple Touch Icon >>(PNG)<<
Favicon >>(PNG)<<
180x180
- Apple Touch: solid full square bg color of your choice, make sure it matches or complements the site's colors
- Favicon: solid SHAPE bg color - I don't do a full square, cuz that looks weird on the browser tab. I'll usually do a circle or oval or something for the bg. A lighter color is generally good to use for this bg to help the item of the favicon stand out
When a Mockup is Approved
- All images used in the approved mockup: move them and their design files (most especially the logo), to their Client Dropbox folder 'images-created/website-images'.
- Document into Artwork Notes in Artwork tab in their SBS profile:
- Ratios of Rotator, QL, News (Standard Landscape1600x1200/Portrait1200x1600, Wide 1600x900, Superwide 1600x669, Square 1200x1200
- Fonts
- Colors
- Mass times and footer info: legit makes copy/pasting so much easier if it's not already in the build site
Make adjustments to images as needed. Sometimes cropping needs to be done on some background images, etc. Create image files for any School or Subsites. Check their SBS profile for that info.
When all files are compiled, move all the design files to the 'design files' folder.
Ministry Layout (Titles on the Image)
- Details
- Tori Schippers

Step 1) Create a Category blog menu item.
Step 2) Go to Blog Layout settings and put 1 in the "# Leading Articles" and 3 in the "# Columns" section.
Step 3) Go to Options setting and make sure that "Show Title" is set to Use article settings and that "Linked Titles" is set to Yes.
Step 4) Go to Page Display and add the class ministrypage img-title to the "Page Class" setting.
Step 5) Save and close menu item.
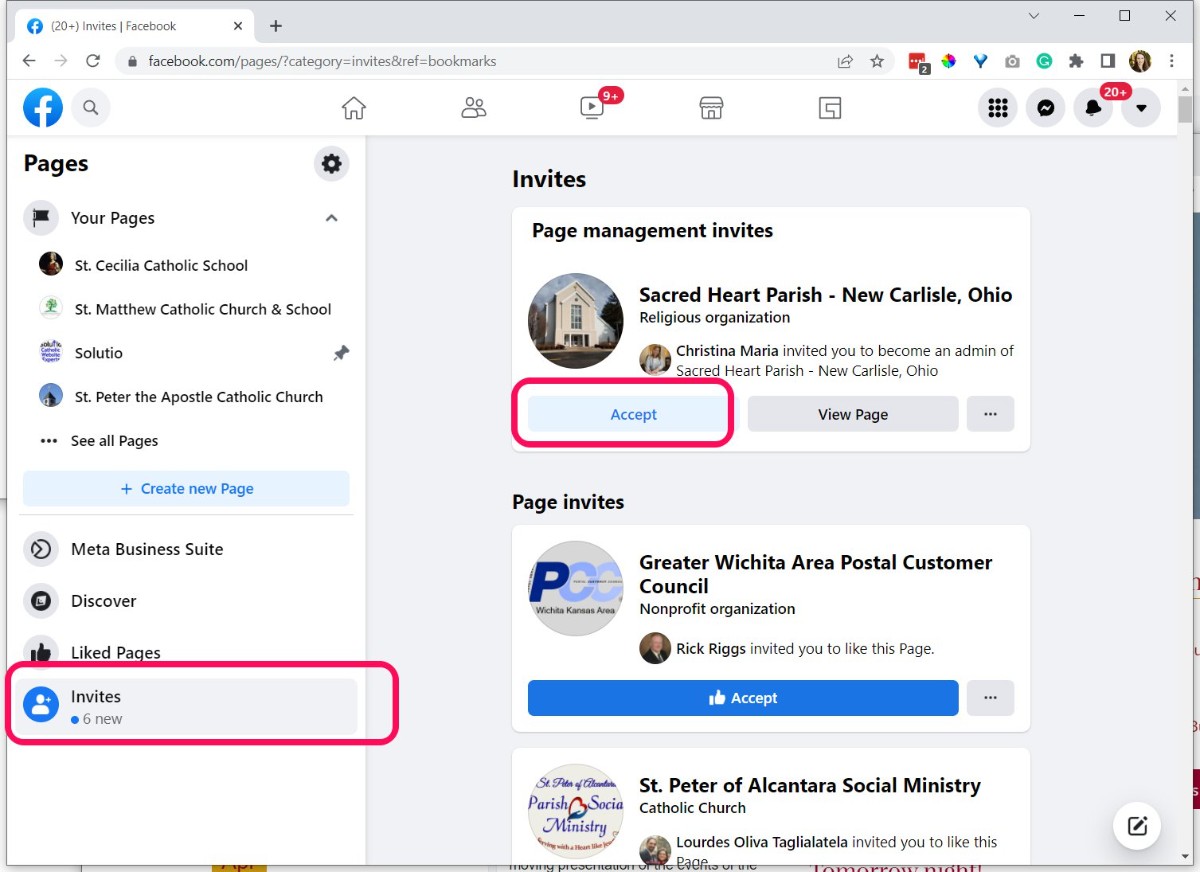
Facebook Widget -- Page access
- Details
- Jackie Riddel
Here is how a person can share their page access with Solutio
with: This email address is being protected from spambots. You need JavaScript enabled to view it.

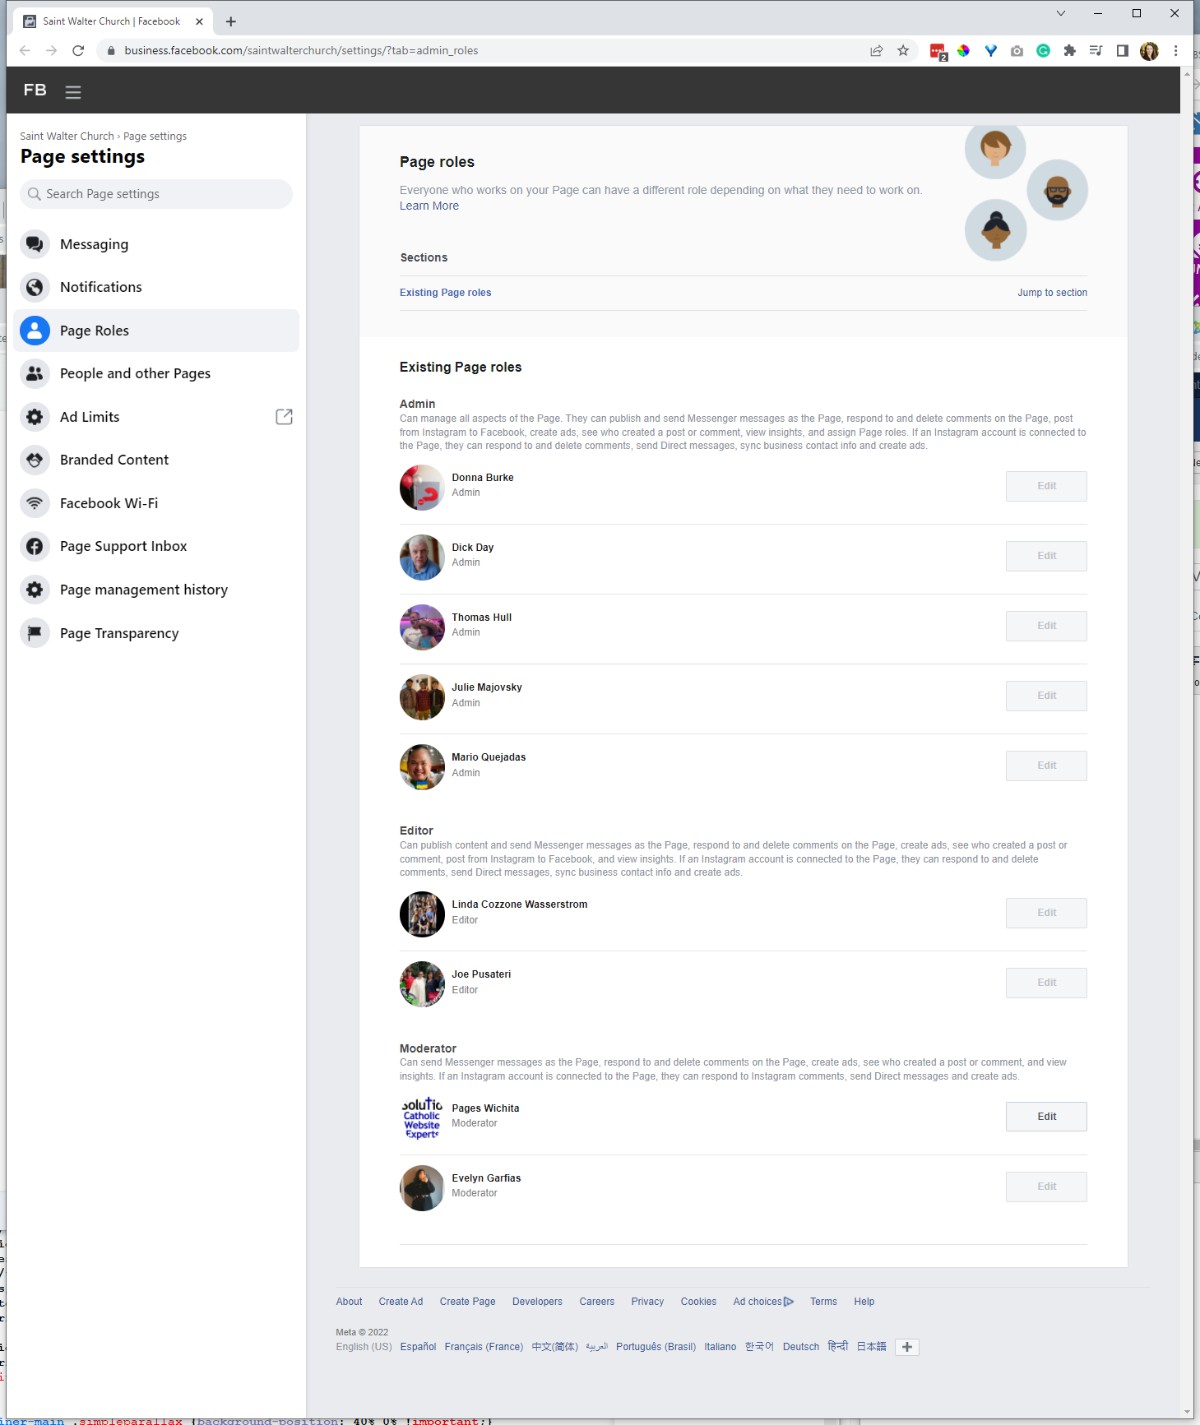
After access has been shared, Pages Wichita has to accept.
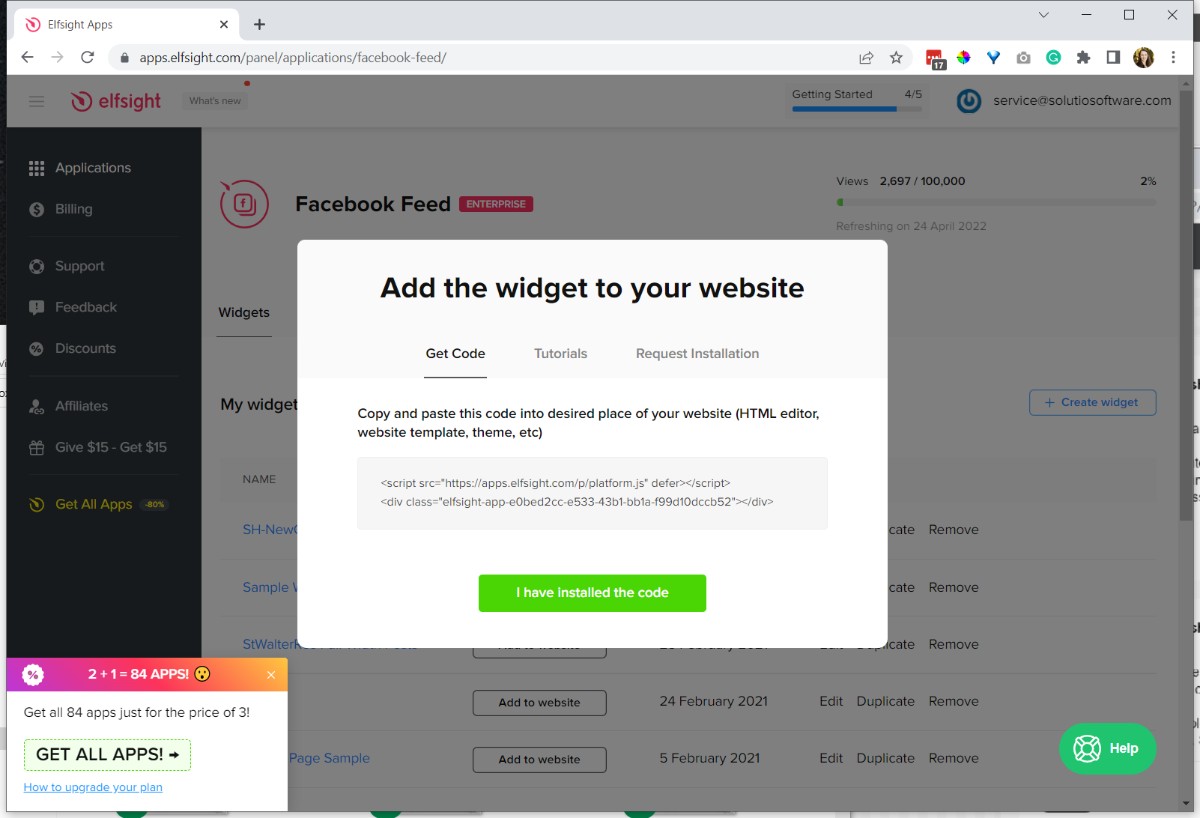
Log Into Elfsight. Select Facebook App. Choose Layout (posts or full width posts)
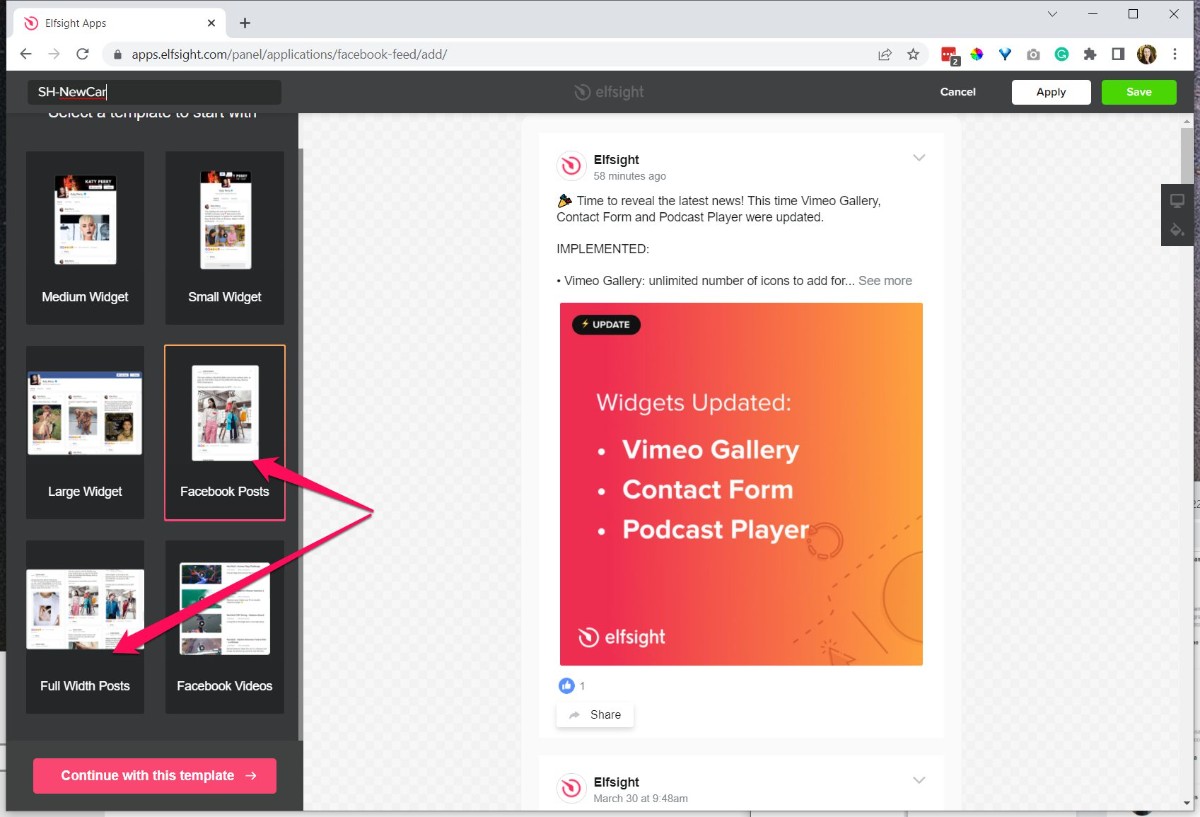
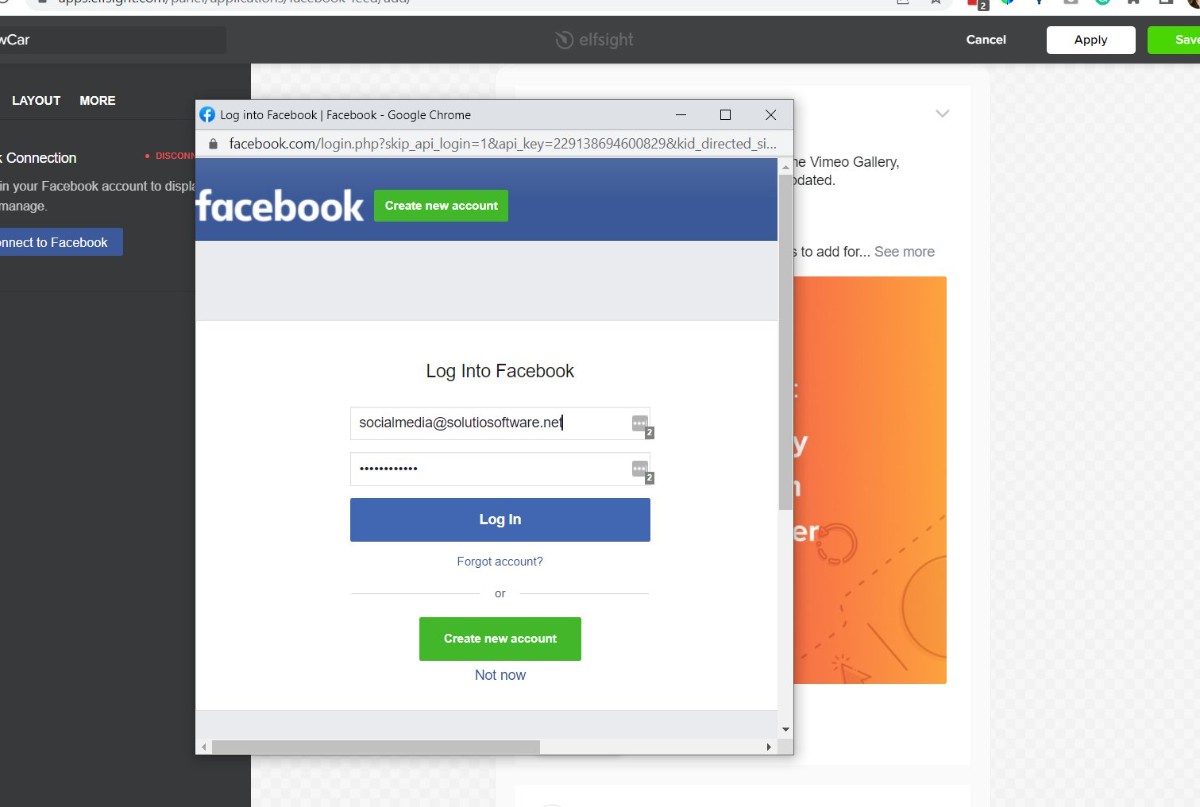
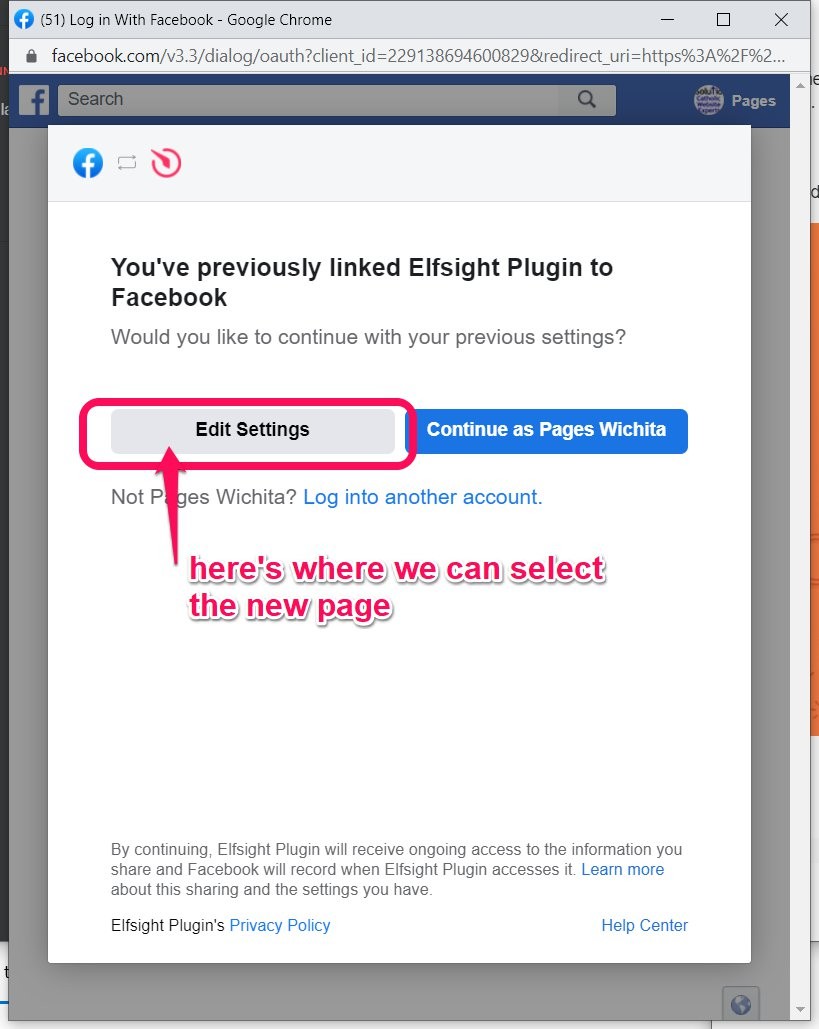
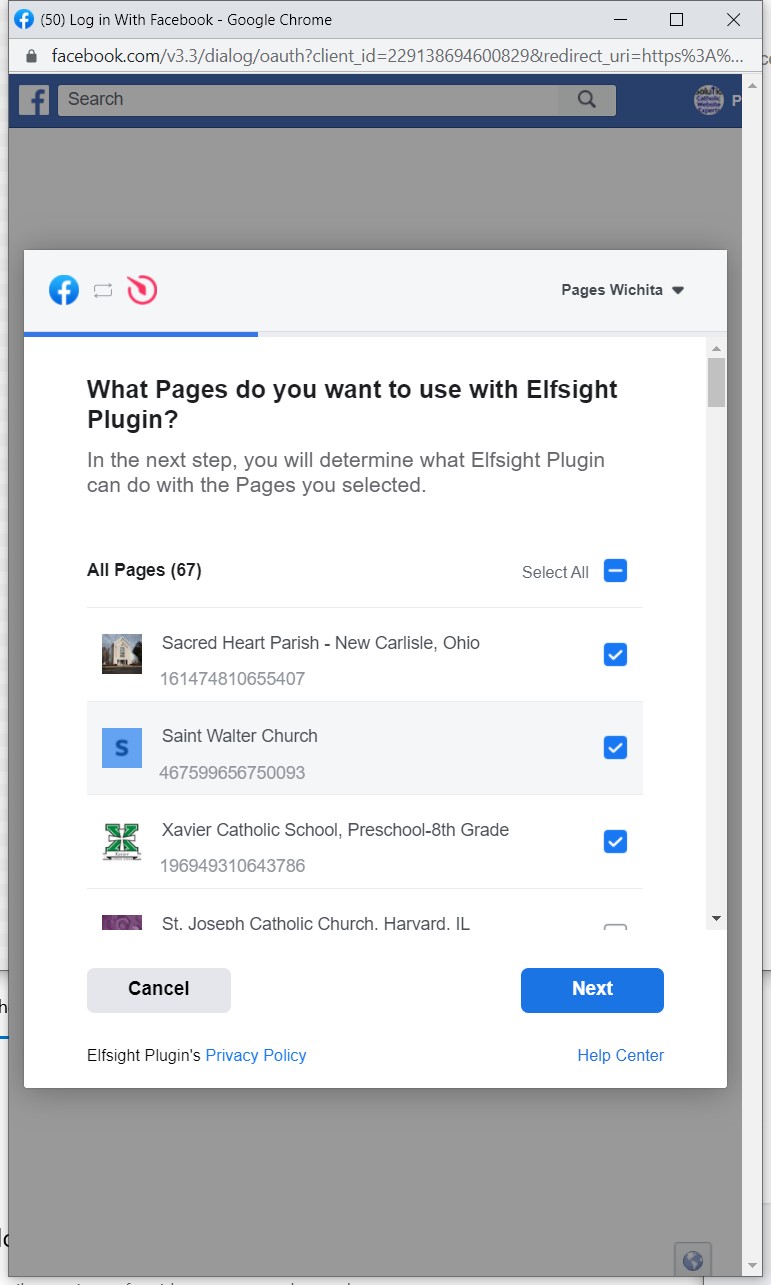
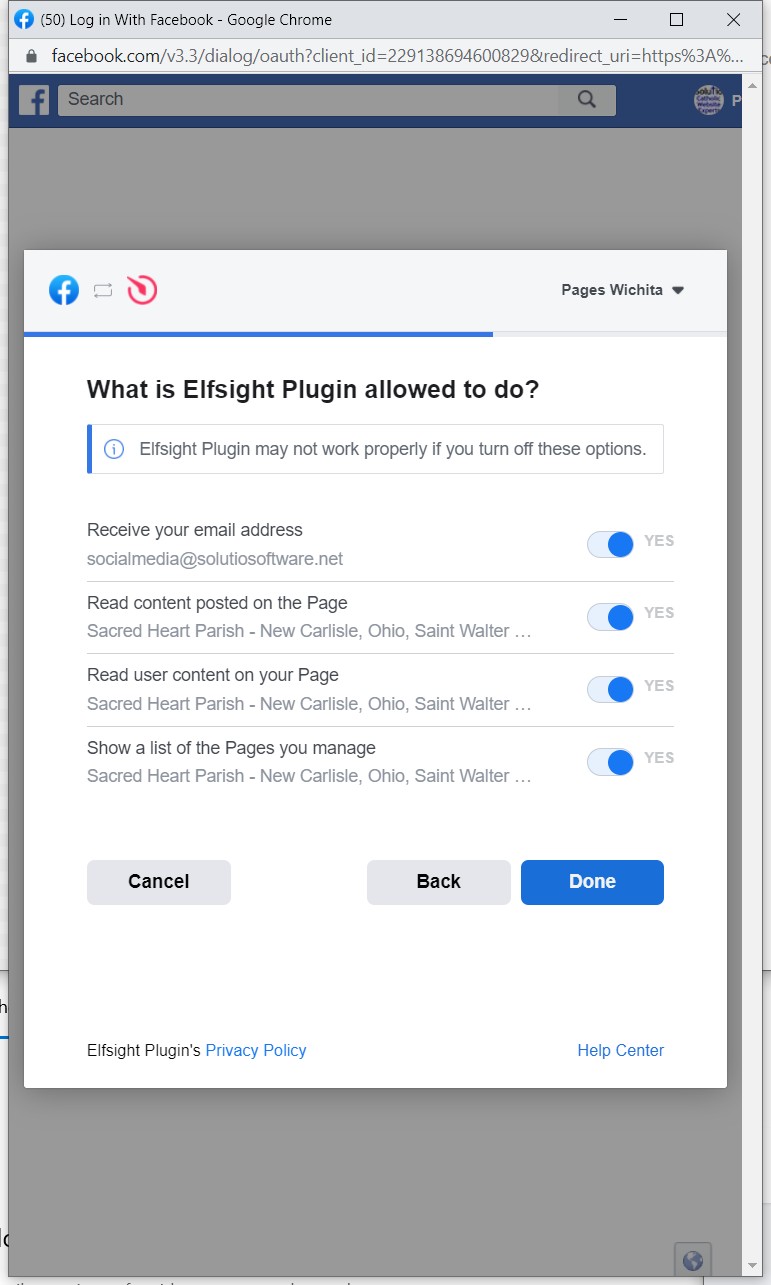
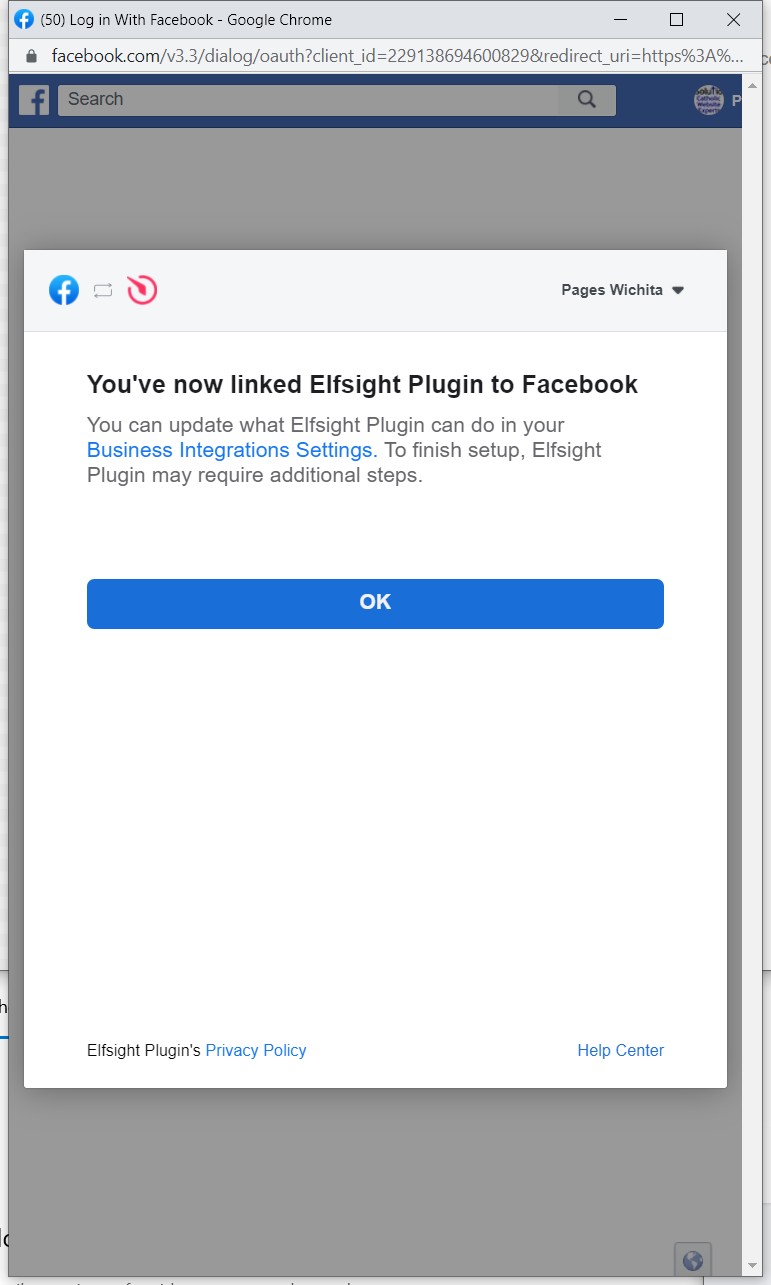
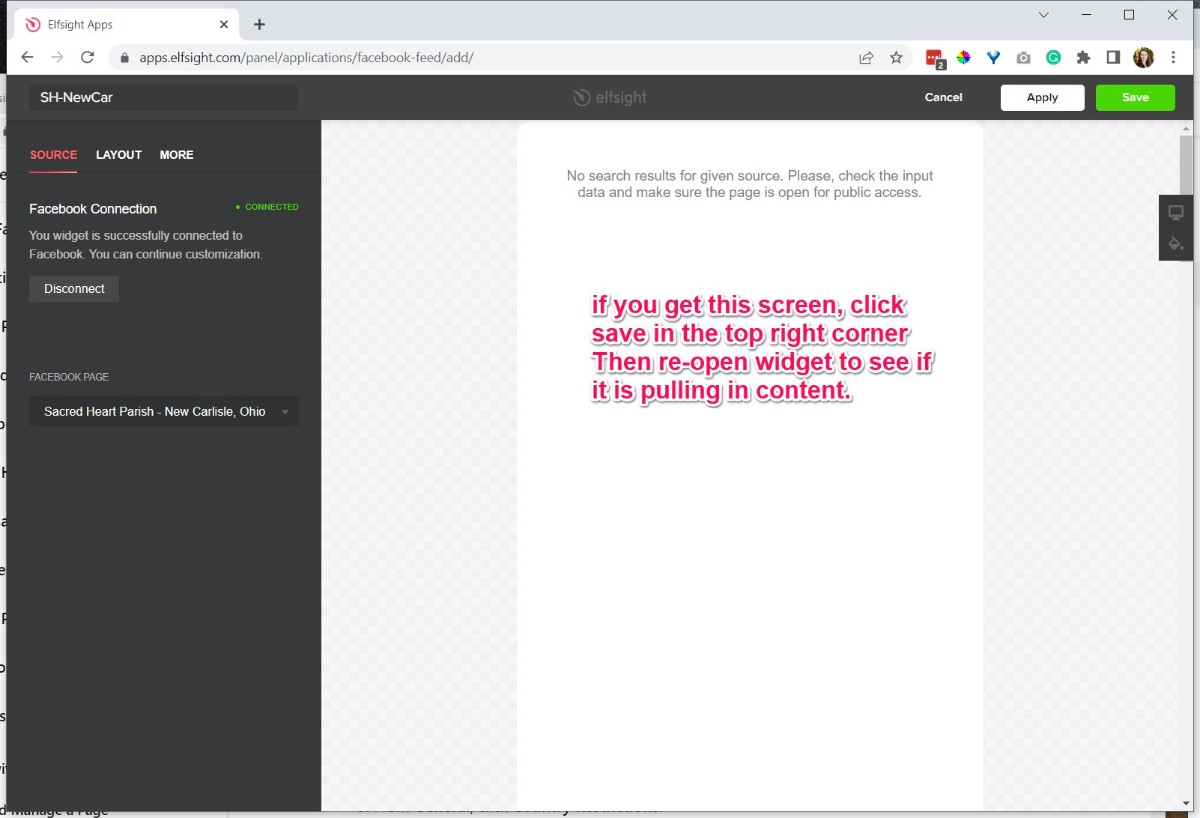
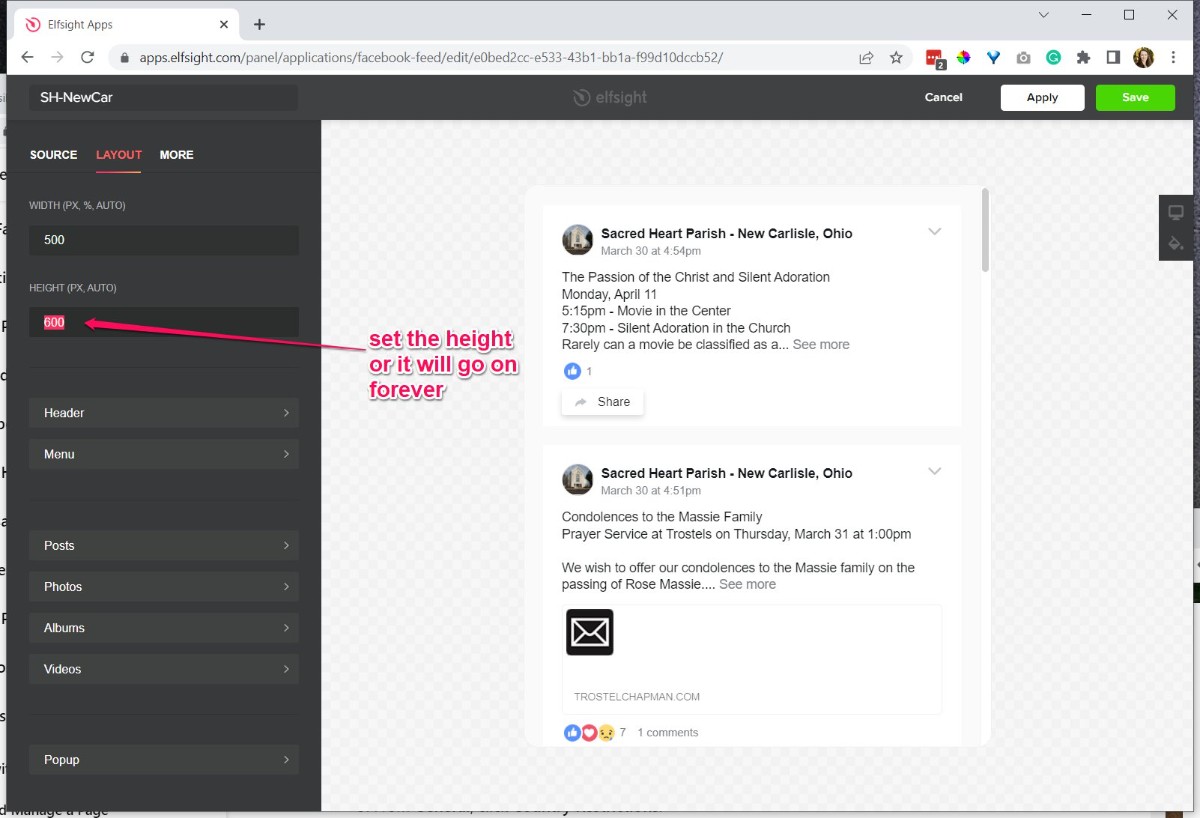
Click add to website from the app screen. Copy code -- will likely go in a module or particle.
Add Footer and Admin Footer
- Details
- Tori Schippers

- Update “Admin footer” link
a) From the Control Panel, click “Components” tab and then click “Gentry 5 Themes”
b) Select Configure (“Clarity Theme for most sites”)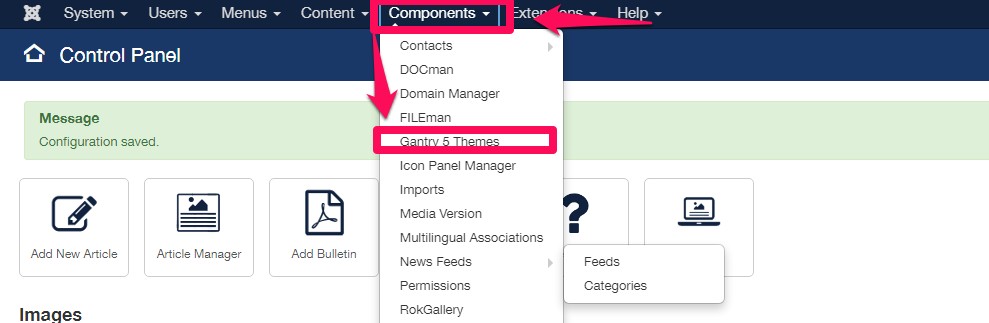
c) Select Base Outline and click “Layout”
d) Scroll down to Admin Footer and click “Gear” on right hand side.
e)Replace the xxxxxx or SITECODE in the code with the site code for the parish/project. (Custom code below in case it is accidentally deleted).
f) Click “Apply & Save” and then save Layout. Return to Control Panel. Save Layout and go back to Control Panel - Update Footer information
a) From the Control Panel, Select “Article Manager” and search for Footer. Find information at https://www.solutiocloud.us/site-project-pipeline-dos/Build (open up their current website and pull info from there or from bulletin).
IF MOCKUP approved make footer akin to mockup design
b) Save and close article
Check https://styles.solutiosoftware.com/other-effects/admin-footer for latest instructions for admin footer
<div class="adminfootericon">
	<a href="https://SITECODE.solutiosoftware.com/administrator/" target="_blank">
	<i class="fa fa-lock"></i></a>
	<br><span style="color: #444444; font-size: x-small;">Site by <a href="http://solutiosoftware.com/" target="_blank"><span style="color: #aaa;">Solutio</span></a></span>
</div>
St. ____ Website Sponsorship
- Details
- Jackie Riddel

1. Update the Saint Name in the article.
2. Also, if needed, update the video ID based on the following:
- Parish Only Video: gakQDnhx3N4
- Parish and School Video: NetBCob5NR8
Lower Prices:
- https://form.jotform.com/220585422996970 -- Prices March 2022
- https://form.jotform.com/61514803873962
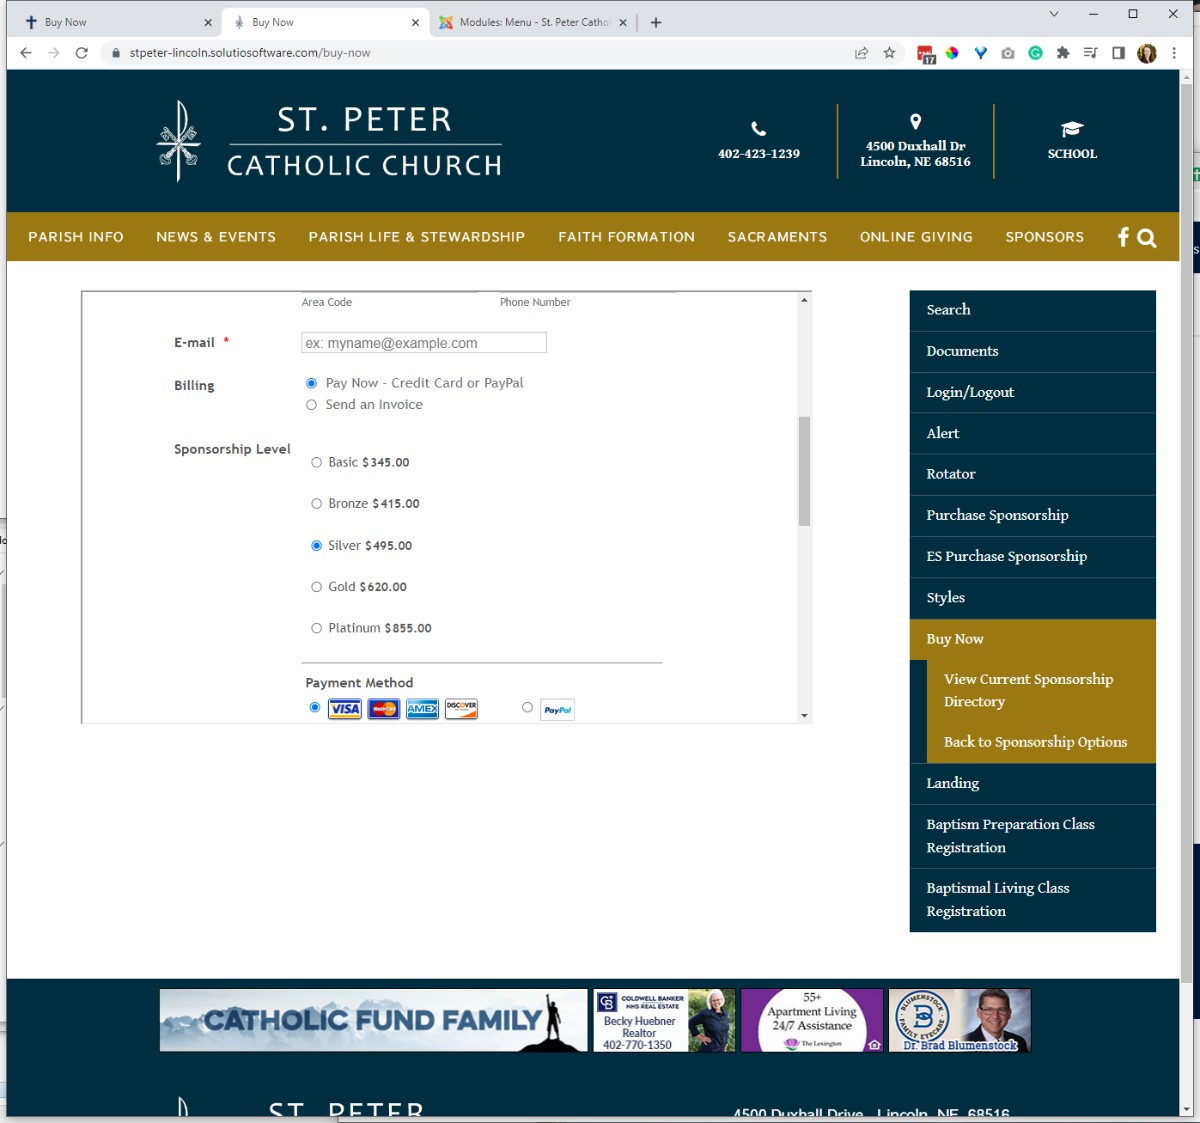
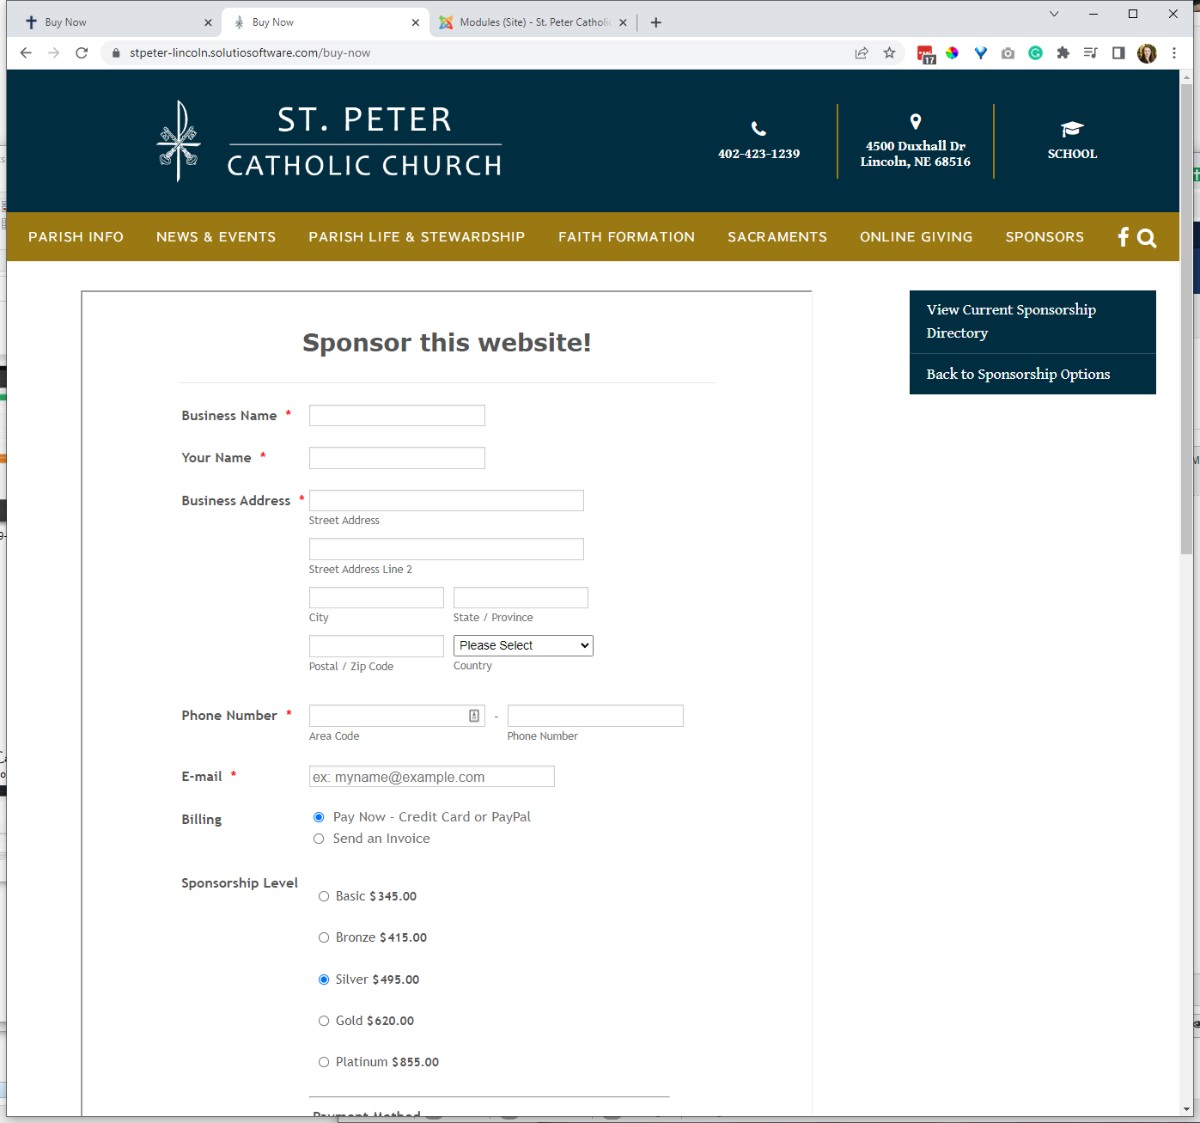
- https://form.jotform.com/201275311755955 (Buy Now page prices 5.3.2021)
BUY NOW FORM PAGE
- scroll bar parameters - 2000px tall
- side menu should be set to level two
Website Traffic: Create Data Source & Report
- Details
- Tori Schippers

Create the Website Traffic
Before creating a website traffic data source and report, you must create Google Analytics Profile and Google Analytics Filter.
(It is easier if you open an incognito window for datastudios)
Log in to https://datastudio.google.com/u/0/navigation/reporting
- Log into Data Sources.
- Click on any data source.
a) Click on any data source (site-code).
b) Make a copy clicking the icon in the top right.
c) Click on Copy Data Source.
d) Rename Data Source
1d) Find your Site Code in the fields and hit Reconnect in the top right.
2d) Click the blue “Apply” button.
3. Create New Report
a) open https://datastudio.google.com/u/0/navigation/reporting in a new Tab (make sure to use incognito window).
b) Click on any report shown (you will make a copy; click on the copy button in the top right.)
c) Rename Report (Site-code).
4. Click Share button down arrow. Select Get Report Link
5. Click Change Sharing Settings and change it to Anyone who has link Can View
6. Click the embed report button and select “Embed URL”
7. Go to SBS' CASA control panel and select "All Sites"
a) Select the site you are working on.
b) Click edit site button in the upper right corner.
c) Paste Emebed URl in the Analytic Link at the very bottom. Hit Save.
d) To check your work, hit the "Analytics for Client (Public) button. Copy URL.
8) Go to the site's website.
9) Select "Icon Panel Config" in the Solutio Admin section of the Control panel.
10) Open up Website Traffic and paste the Code from step 7d. in the Link section. Save and close.