Badge Calendar - RokMini Events API Settings
- Details
- Jackie Riddel

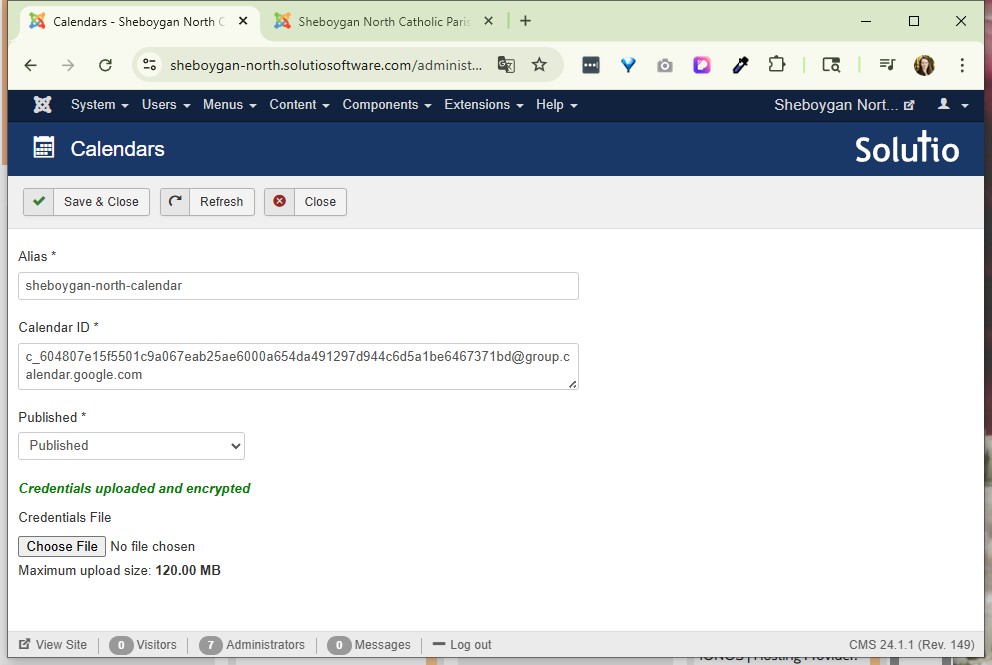
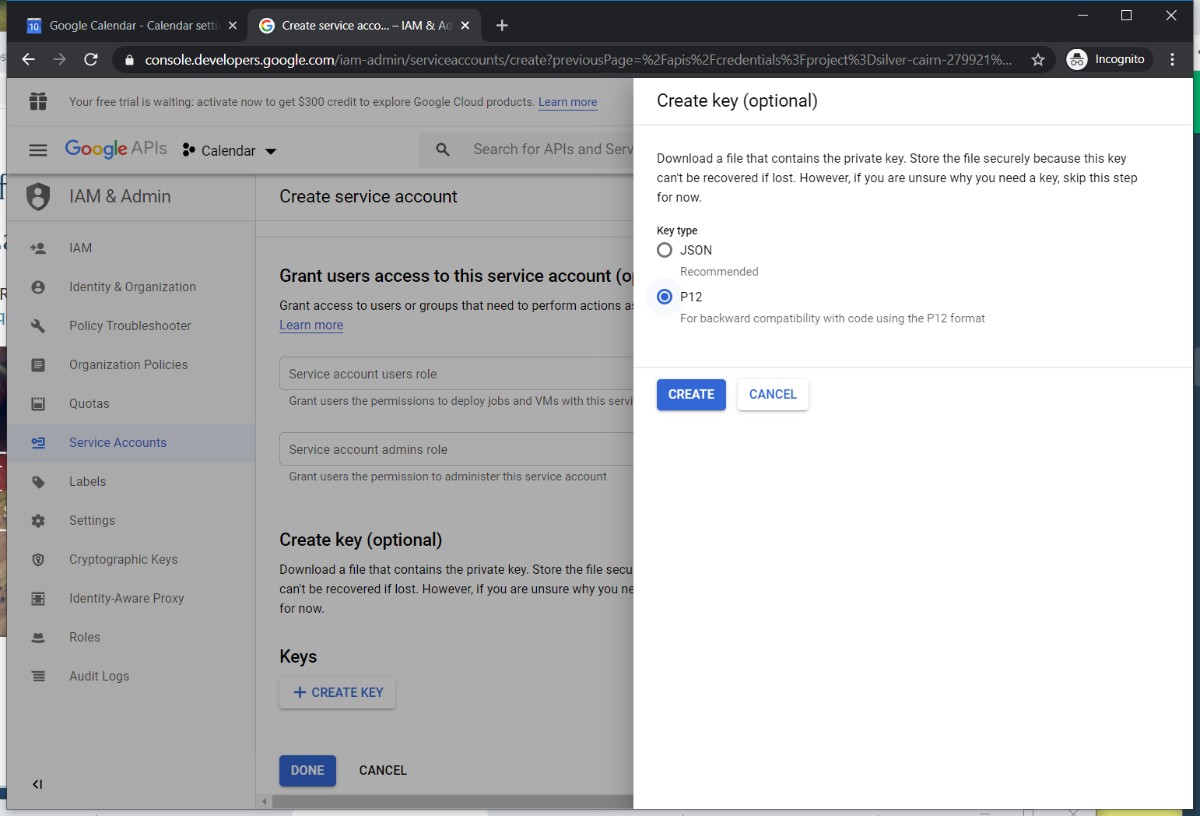
Go through the same API settings as before. Generate a json instead of a p12 file.
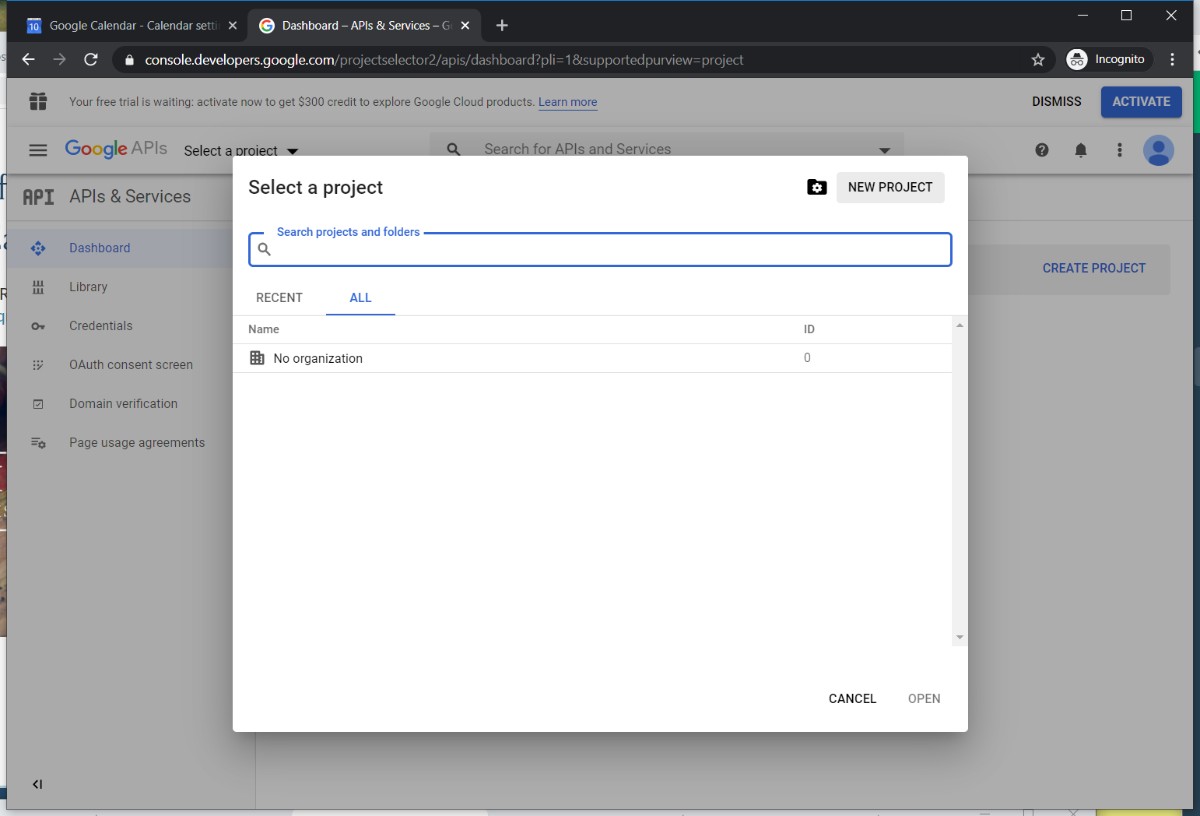
1. Google Developers Console.
https://console.cloud.google.com/apis/dashboard?inv=1&invt=Ab0SpQ&project=sheboygan-north&supportedpurview=project
2. Create new project
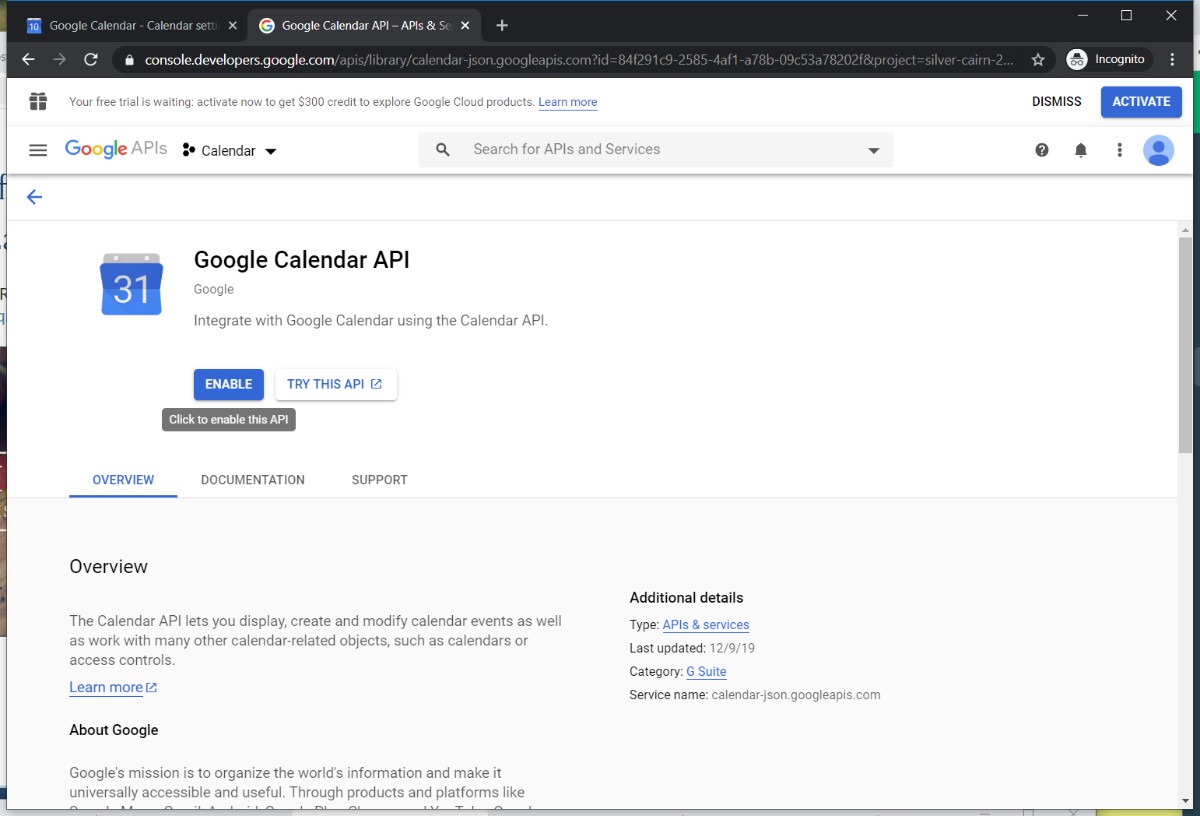
3. Enable Google Calendar API in the Library
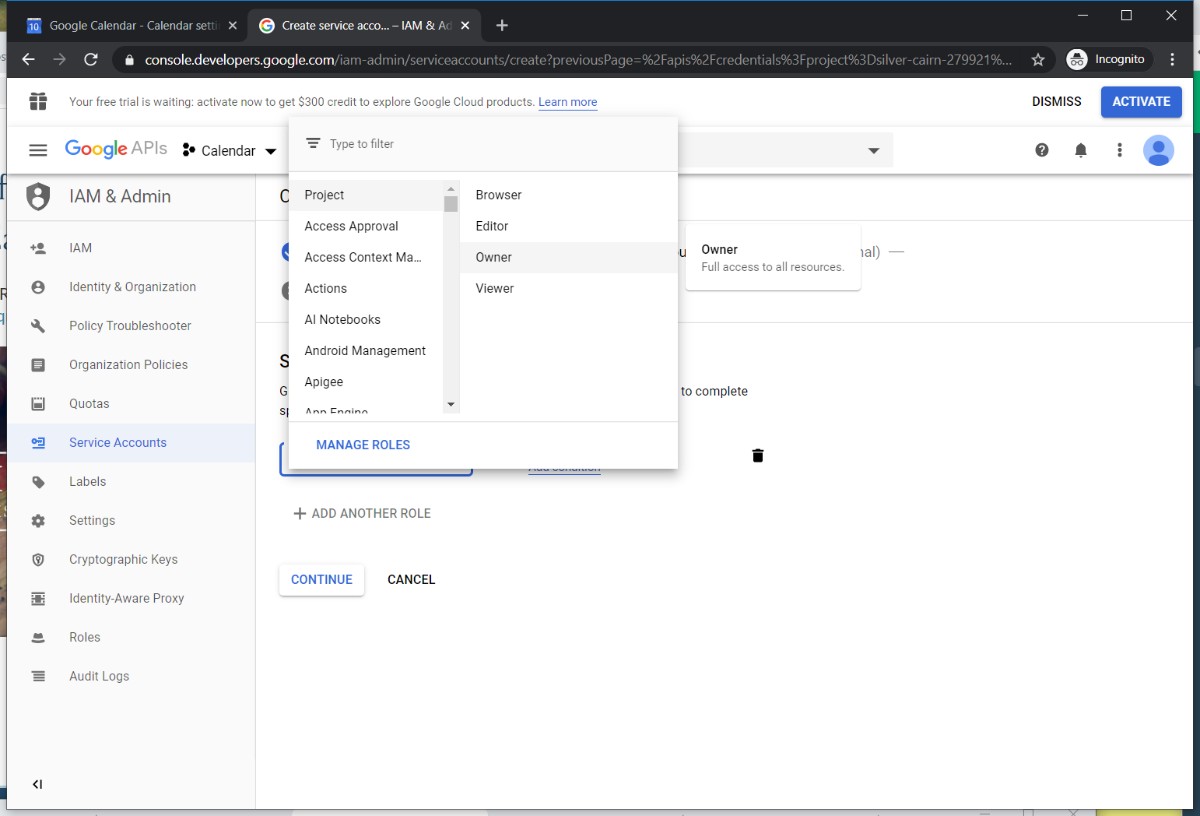
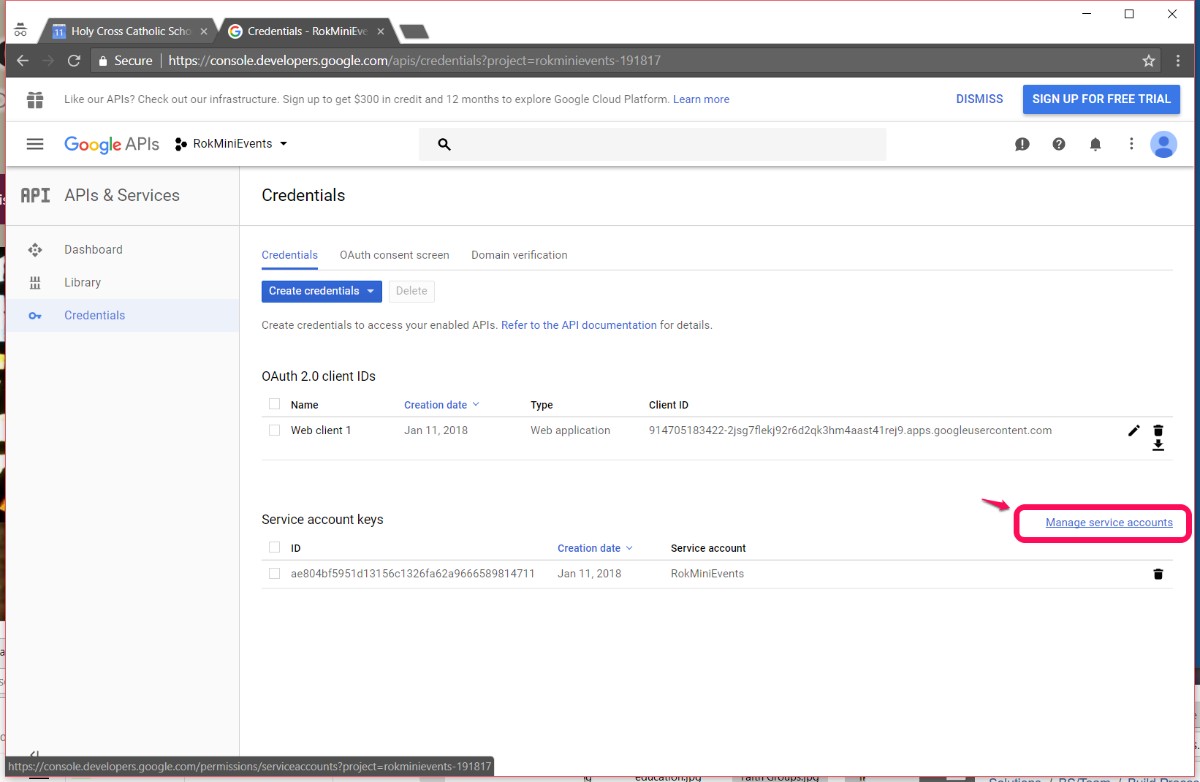
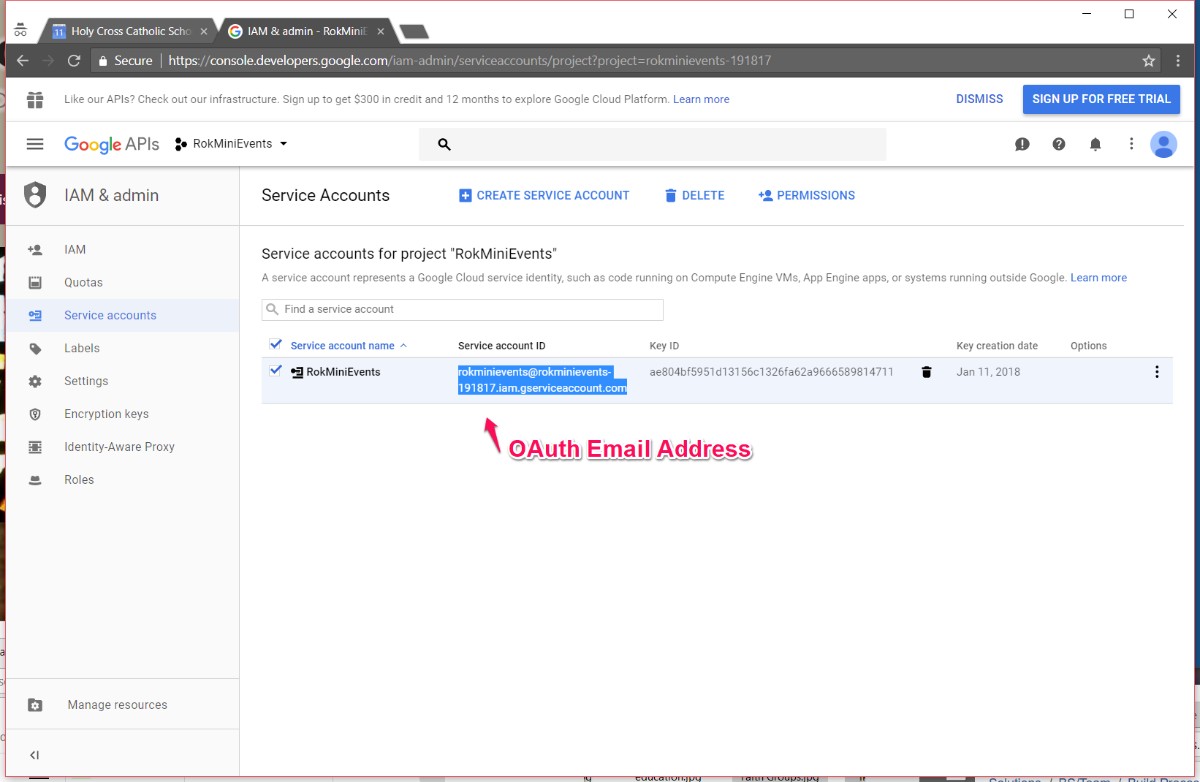
4. Credentials: configure consent screen, create OAuth Client ID and then Service Account. Click through service account email address to get to keys screen to generate json file for uploading to the Admin Tools Calendars Screen
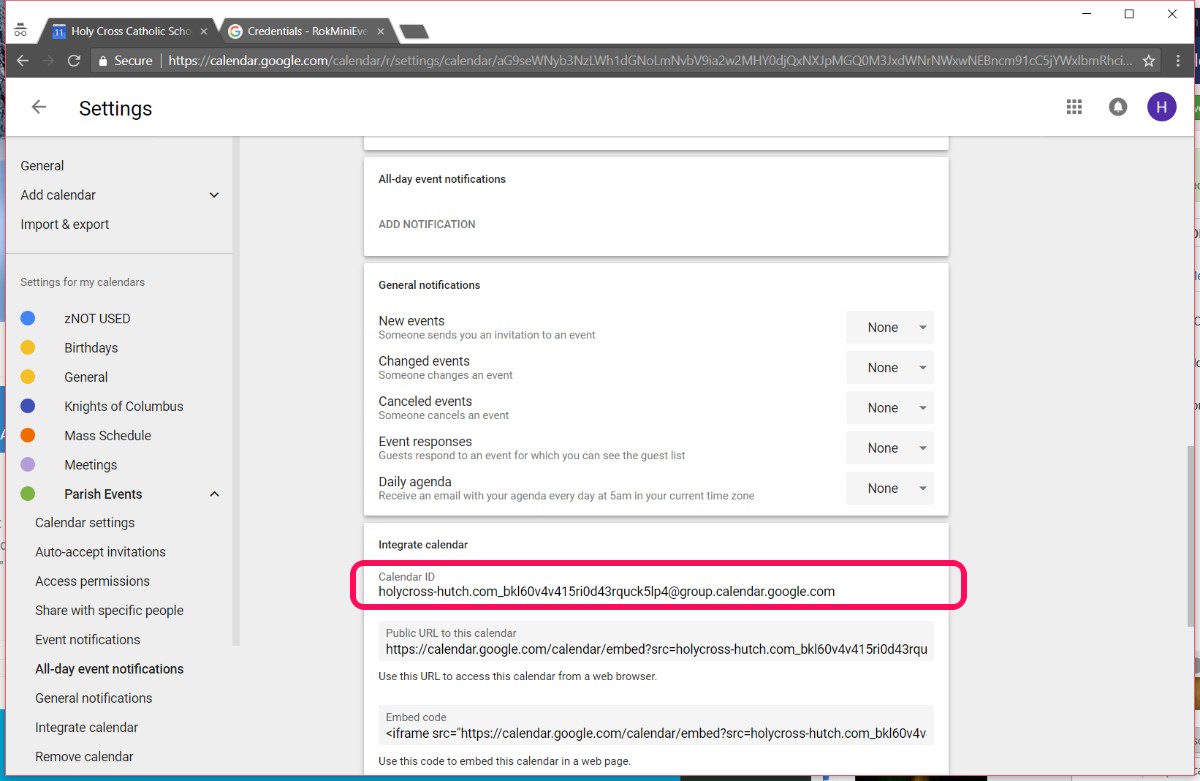
5. Alias - you create, suggested
sitecode-calendar
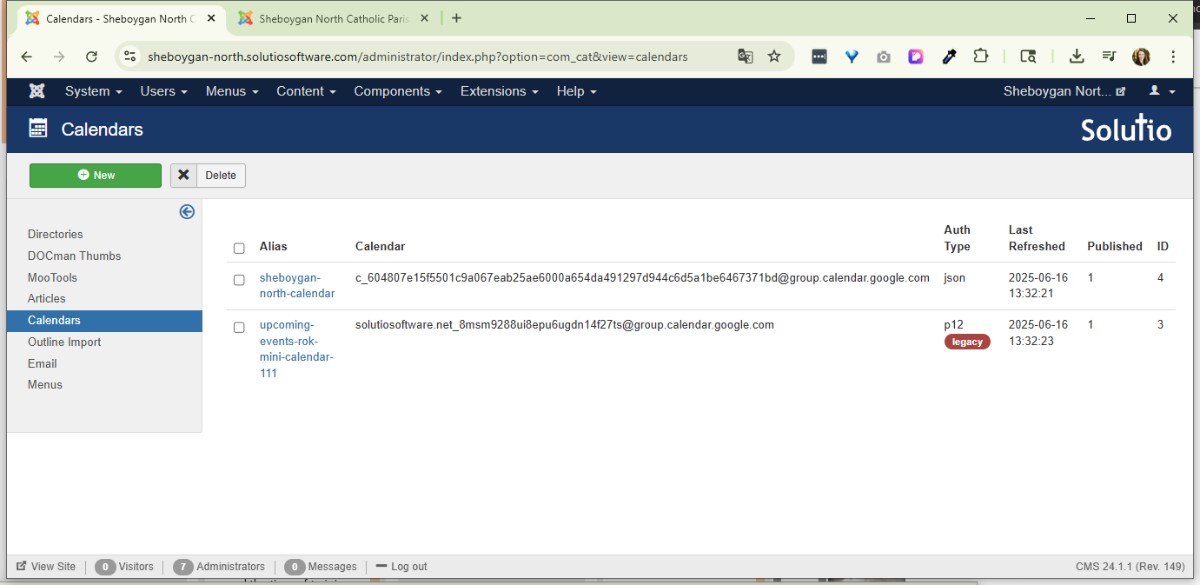
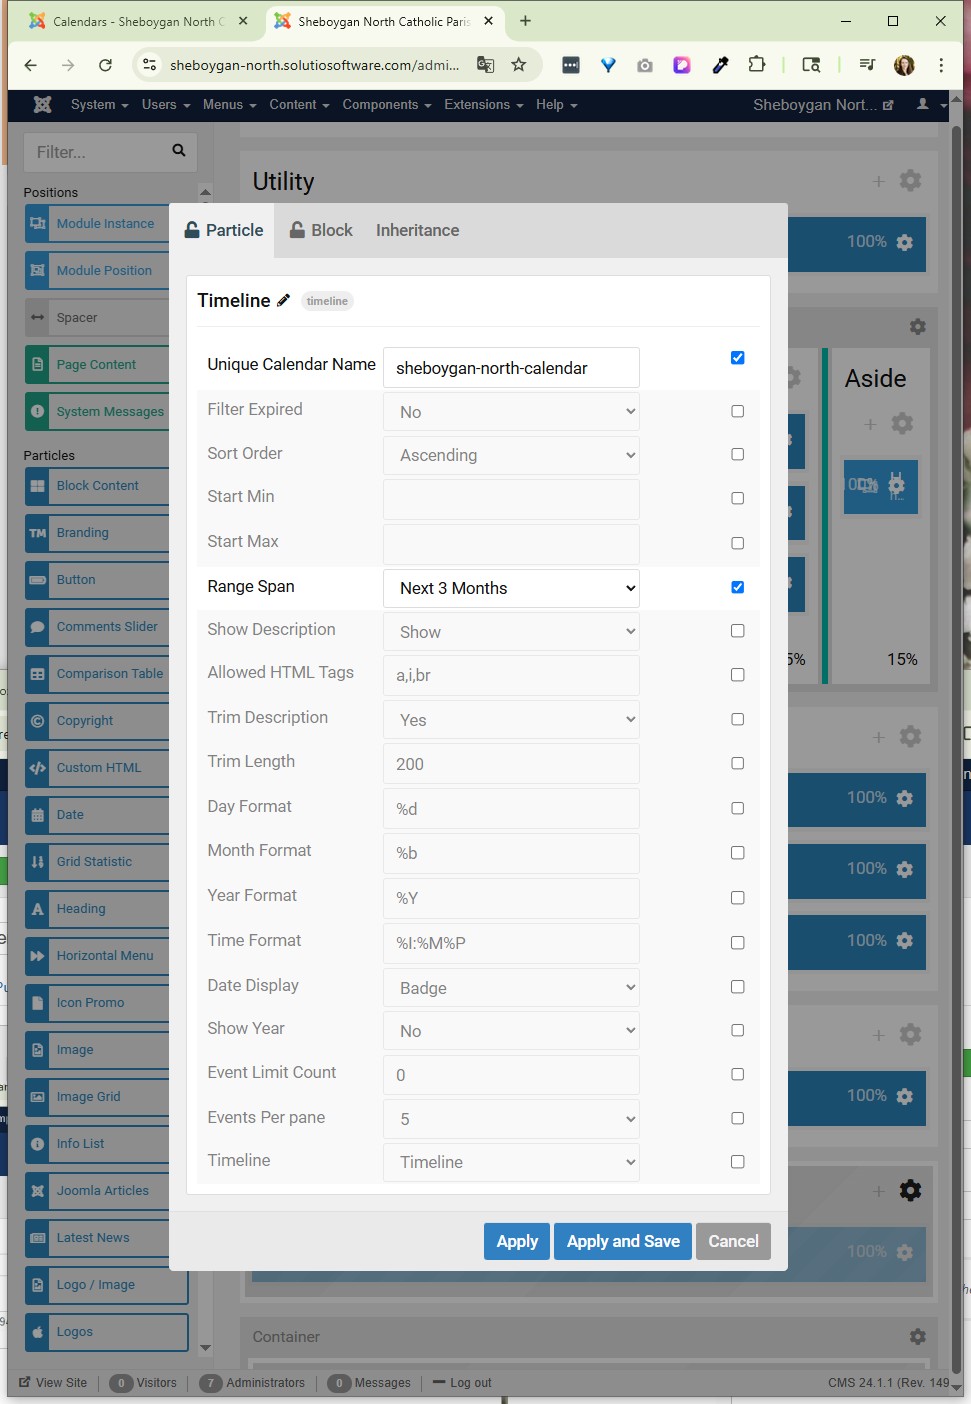
Update Alias in the Unique Calendar Name field in gantry 5 particle (either in outline or as a module)
On the previous Admin Tools screen, refresh to get calendar to load.
================================================================================
Updated 3/17/17 by JKK
NOTES FROM ANDY:
http://www.rockettheme.com/docs/joomla/extensions/rokminievents/google.md
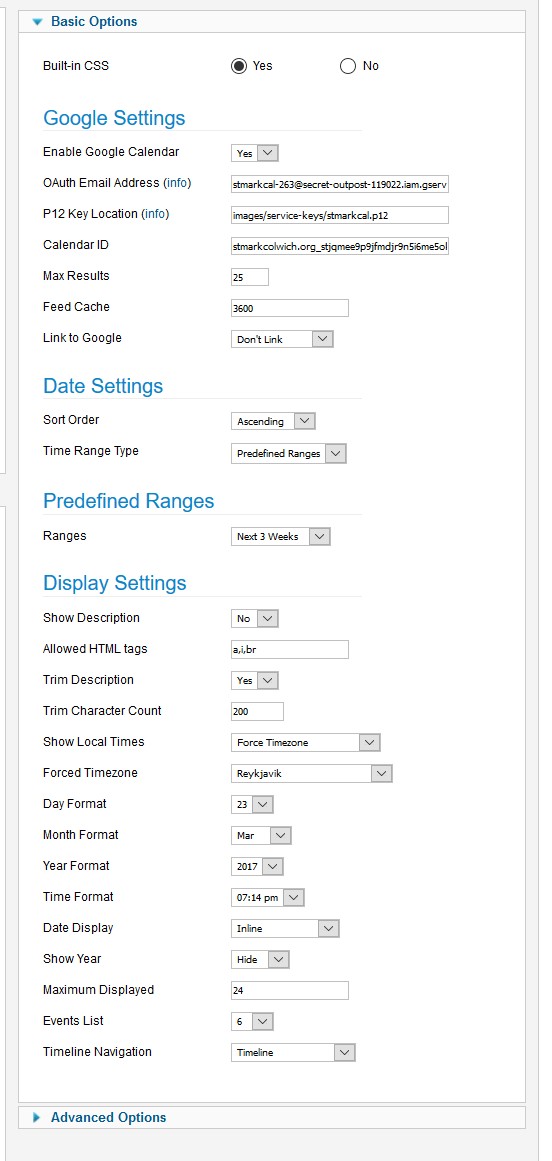
When you go to upload the .p12 file you download from the Google Developer Console (which you'll want to visit from the signed in calendar account), upload it to images/service-keys/filename.gcal. For example, I did a test with one of my Solutio calendars and the path I entered into the module for the "P12 Key Location" was:
images/service-keys/gcal.p12
This new service-keys directory is protected from public web access so it's safe to store the key there. The new version of this module also has a responsive output.
INSTRUCTIONS:
-Visit in the signed in calendar account
https://console.developers.google.com/
https://console.developers.google.com/projectselector2/apis/dashboard?pli=1&supportedpurview=project
-Enable and manage APIs
-Set Up OAuth first then service account
-To create an OAuth 2.0 client ID in the Google Developers Console:
-
Go to the Google Developers Console.
-
Click 'Library' - search Google Calendar API - Click Enable.
-
On the left, click Credentials.
-
Create a project - any name will suffice
-
Click Create Credentials, then select OAuth client ID.
-
Configure Consent Screen. --only field needed is Product Name Shown to Users ( If this is your first time creating a client ID, besides being able to select your application type, you can configure your consent screen by clicking Consent Screen)
-
Select the appropriate application type(Web application) for your project and enter any additional information required. Click Create.-- OAuth Client details will display. Neither are needed to input into RokMini Events module. Click OK.
-
Proceed to make Service Account Key as instructed below.
-
Click Create client ID
To delete a client ID, go to the Credentials page, check the box next to the ID, and then click Delete.
Service Account Key instructions:
-
To set up a new service account, click Create credentials and then select Service account key.
-
Choose the service account to use for the key. New Service Account.
-
Give name, choose role (owner). [Service-account ID is what is needed for the OAuth Email field in module] Choose to download the service account's public/private key as a standard P12 file. Click Create.
-
Your new public/private key pair is generated and downloaded to your machine; it serves as the only copy of this key. You are responsible for storing it securely.
-
Find file in computer downloads. Double click to open, proceed through prompts and type password notasecret.
-
After this, rename file to reflect client. Upload to service-keys folder via FileZilla, Cyberduck or related FTP.
-
FIND the
Input details into RokMiniEvents3 module
-
OAuth Email Address
-
P12locoation
-
Calendar ID (rokminievents can only pull one calendar) make sure calendar is public
Rocketthemes’s documentation: http://www.rockettheme.com/docs/joomla/extensions/rokminievents/google.md
(not updated with google)
TIME ZONES:
Eastern USA = Porto Novo (depends on spring forward or fall back)
Central time = Reykjavik or Dakar
Mountain time - Cape Verde
Western - Sao Paulo (Brazil) - no daylight savings in 2022 or South Georgia (works for DST in 2022)
Honolulu - La Paz
https://www.timeanddate.com/worldclock/difference.html?p1=204
.p12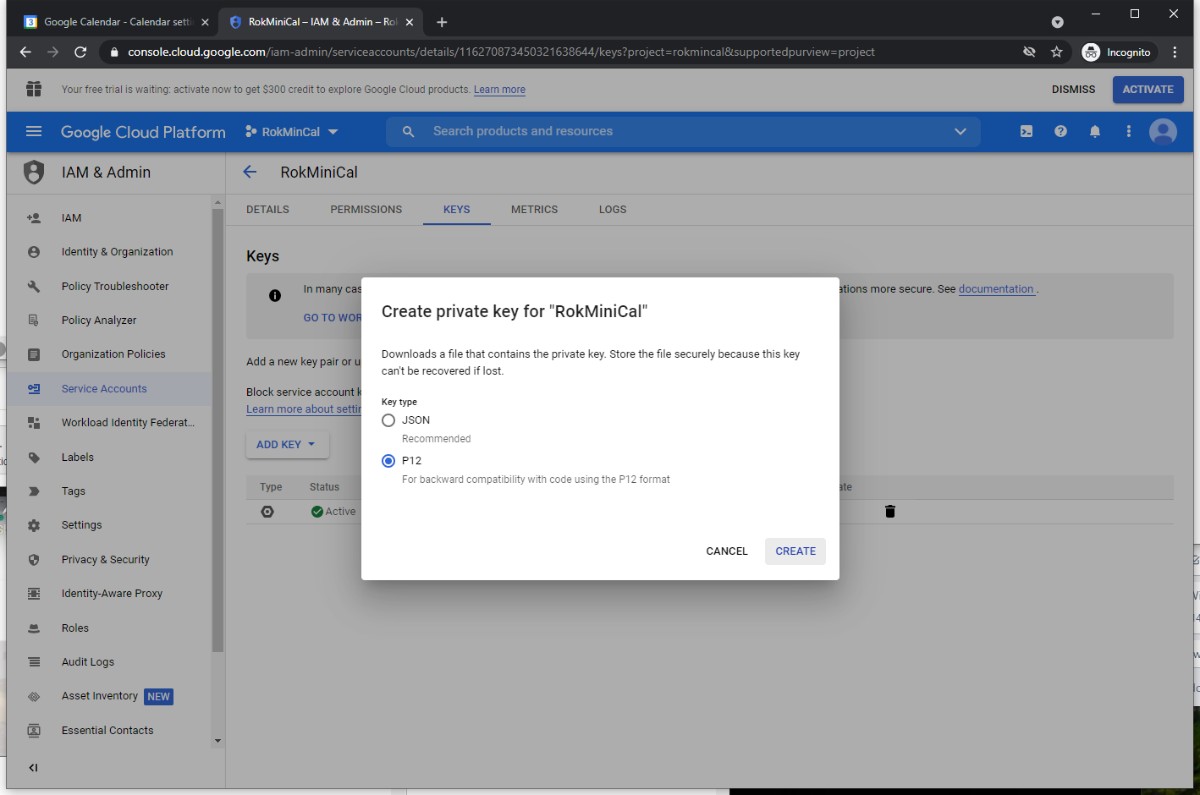
Double click the downloaded p12 file to run it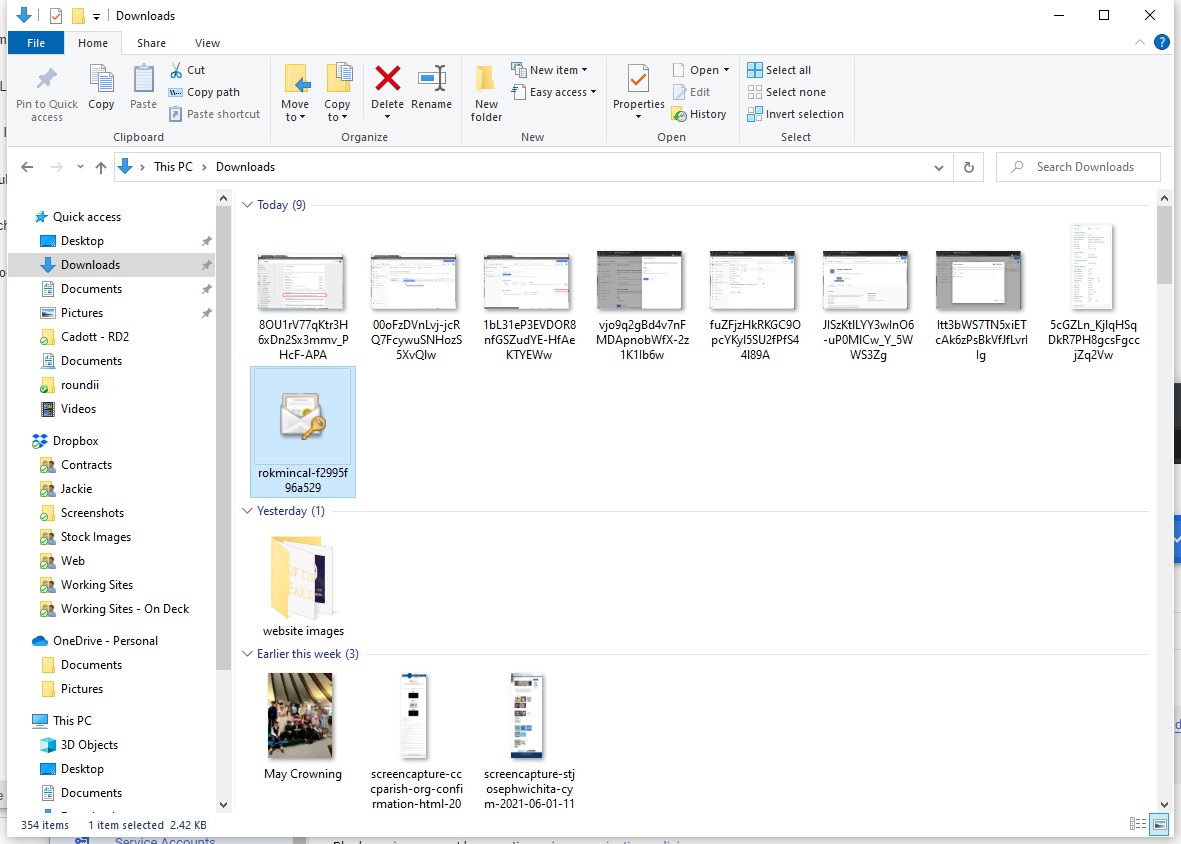
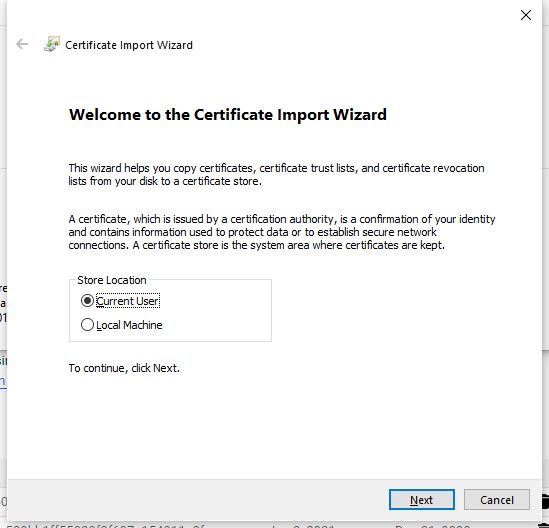
Click through all the steps. The secret has always been notasecret
Error Pages
- Details
- Jackie Riddel

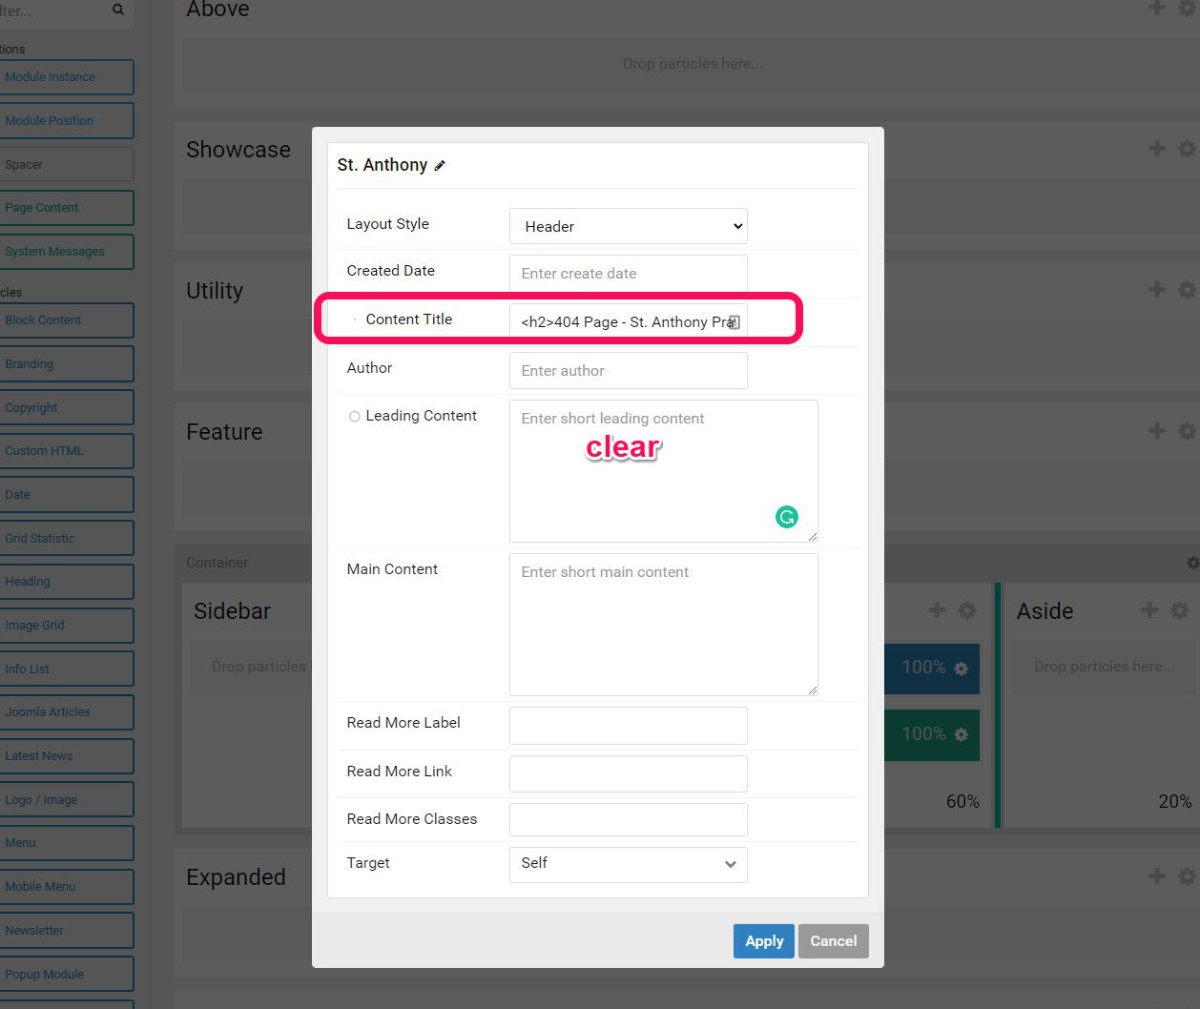
<h4 style="text-align: center;">St. Anthony, please come around. <br />This page is lost and cannot be found.</h4>
<p><img style="display: block; margin-left: auto; margin-right: auto;" src="https://solutio-sop.solutiosoftware.com/images/stories/prayinghands-black.png" /> </p>
<p style="text-align: center;">Please head back to the <a href="/home">homepage</a> and try again</p>
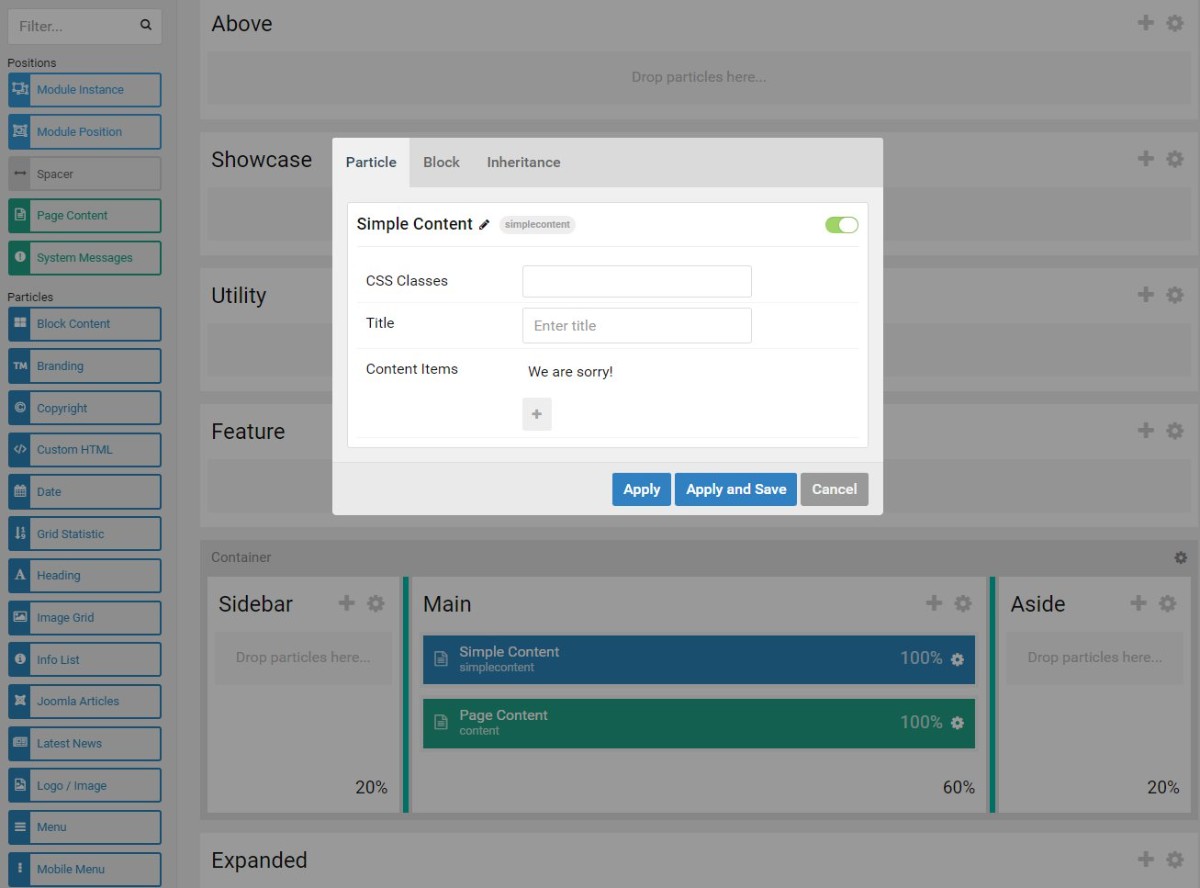
This should already be accomplished in the template import. But incase it is not, the information is still here.
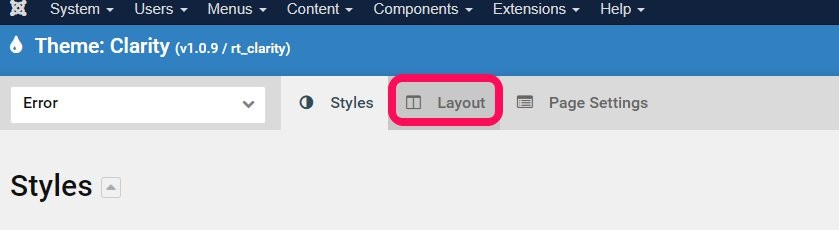
- Navigate to edit the Error Outline Layout
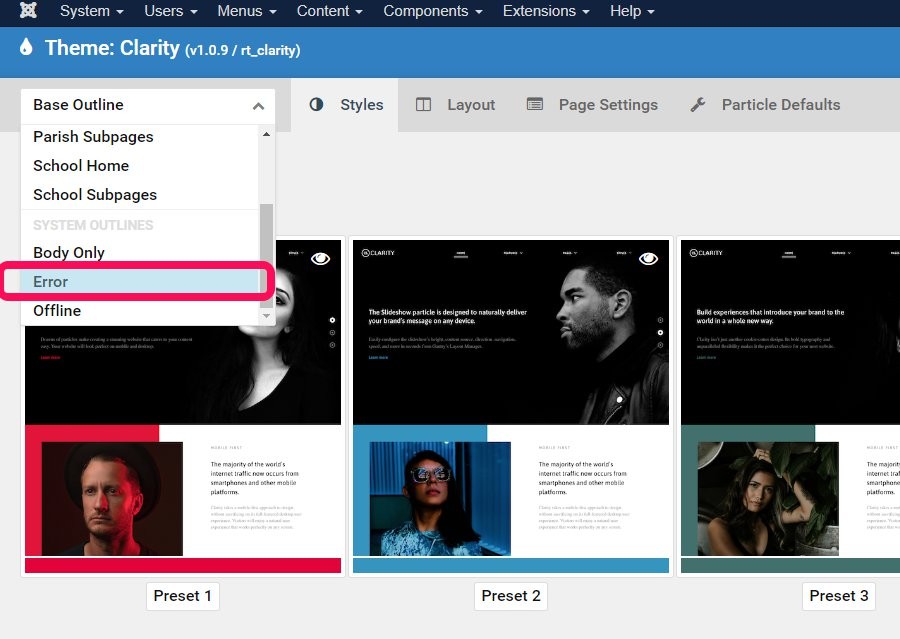
- Move the simple content particle to the Main container. Use the + button to add the second row in the container.
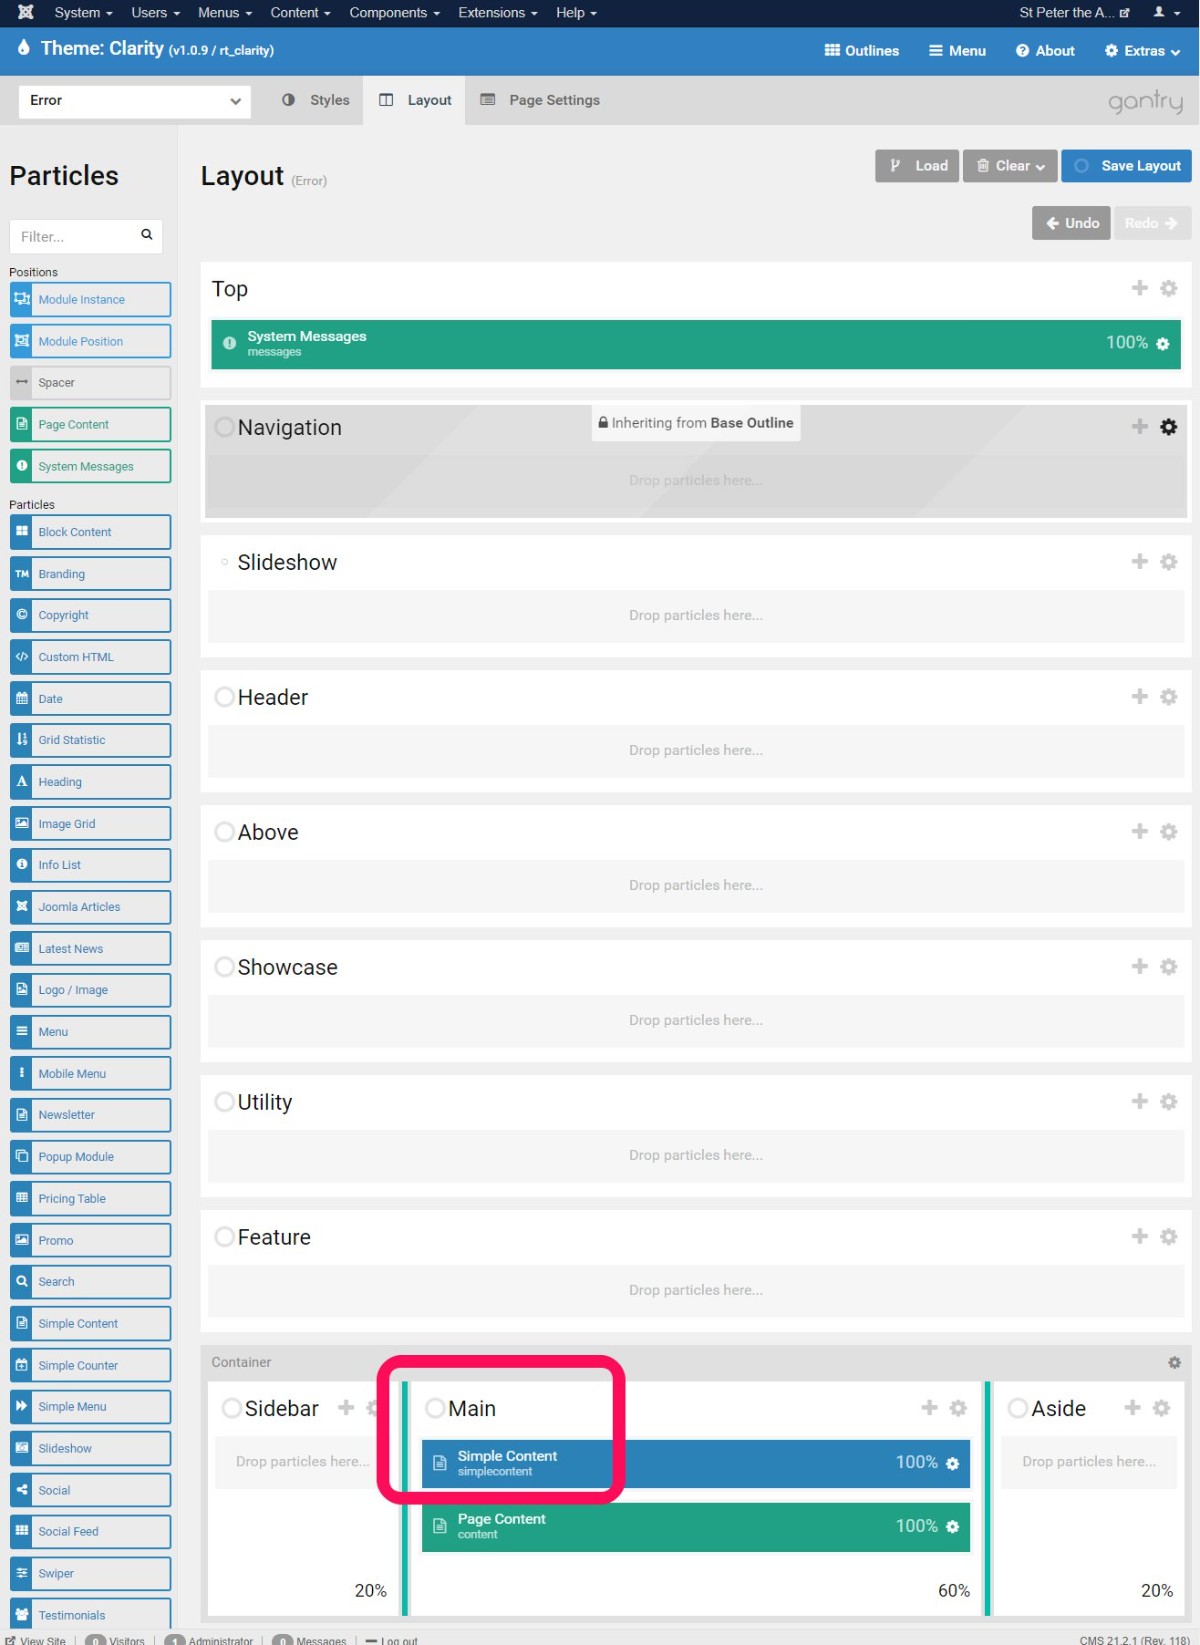
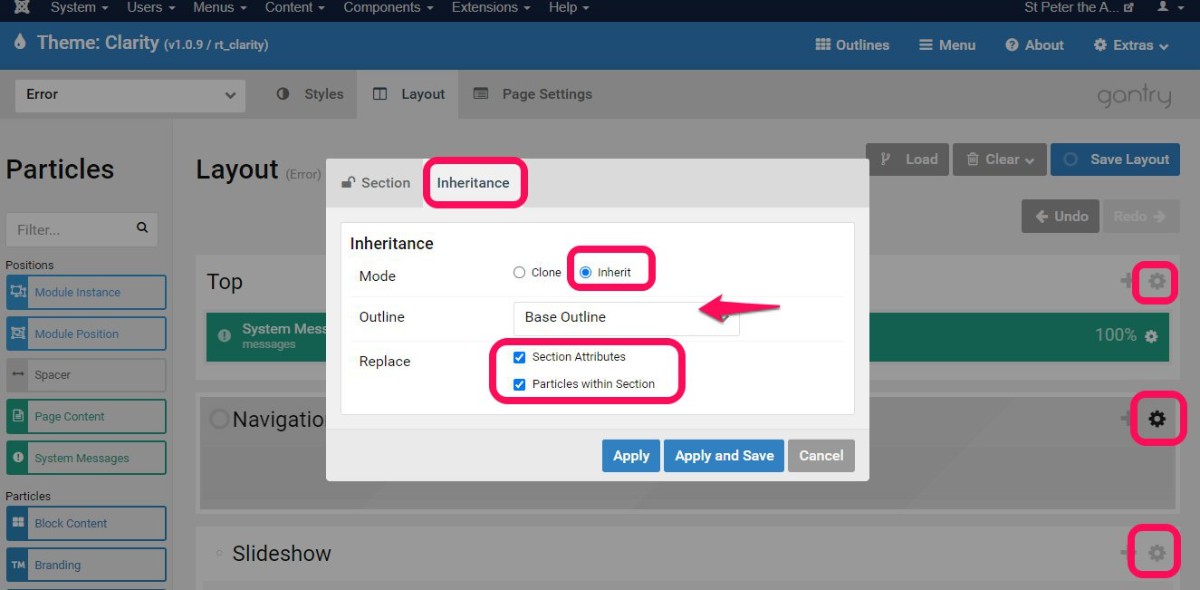
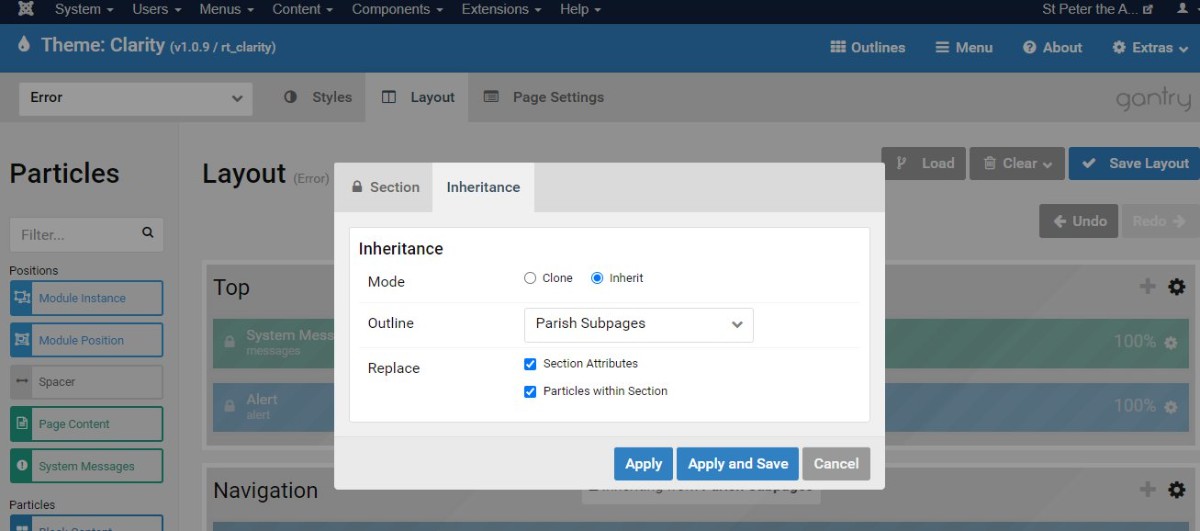
- For the top three containers and the bottom three containers of the outline, set the inheritance to either the Base Outline, or the Parish Subpages outline. In this instance parish subpages inherits top from Parish Home, so we set the same in the Error outline.
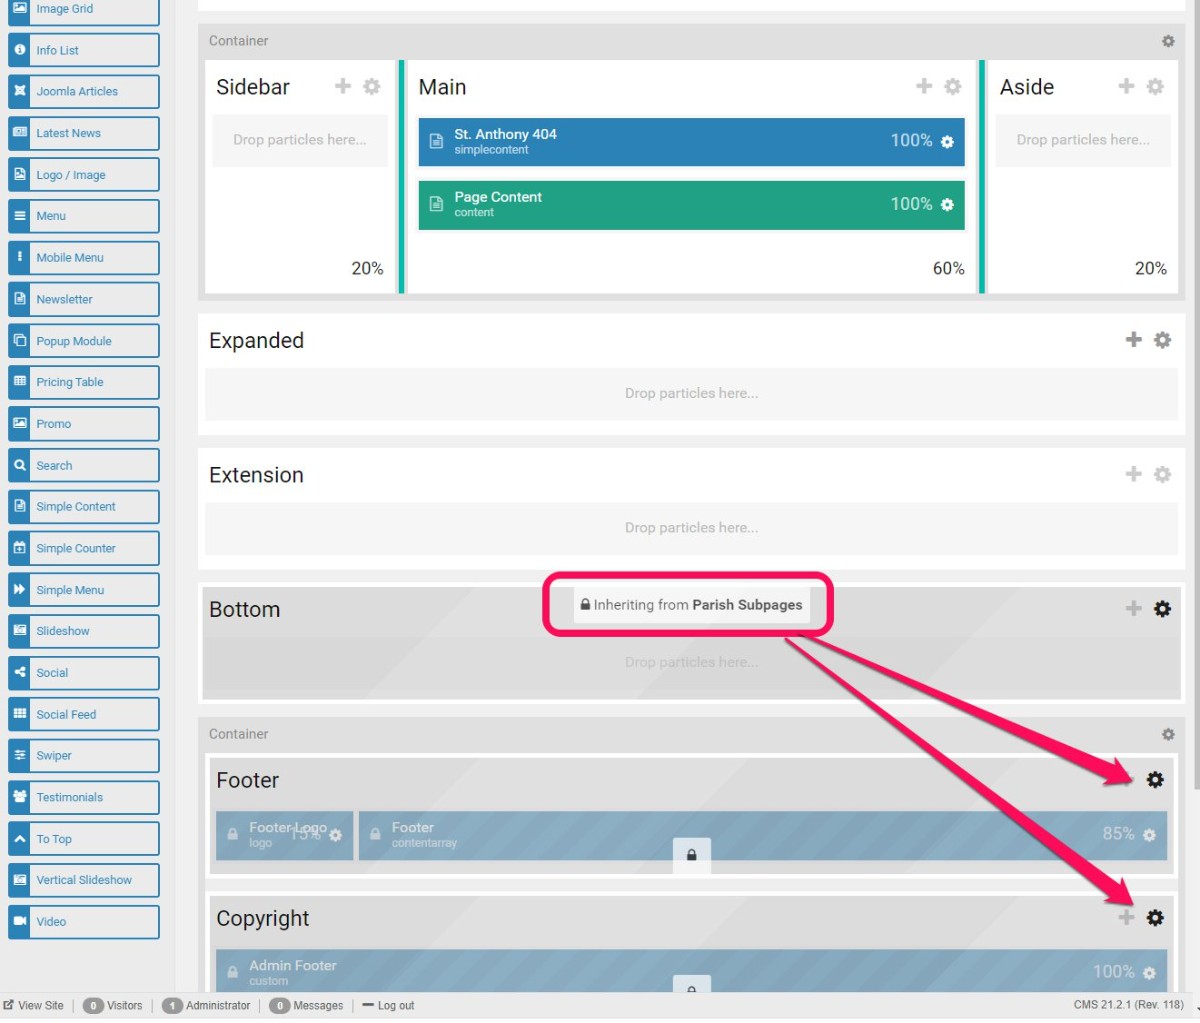
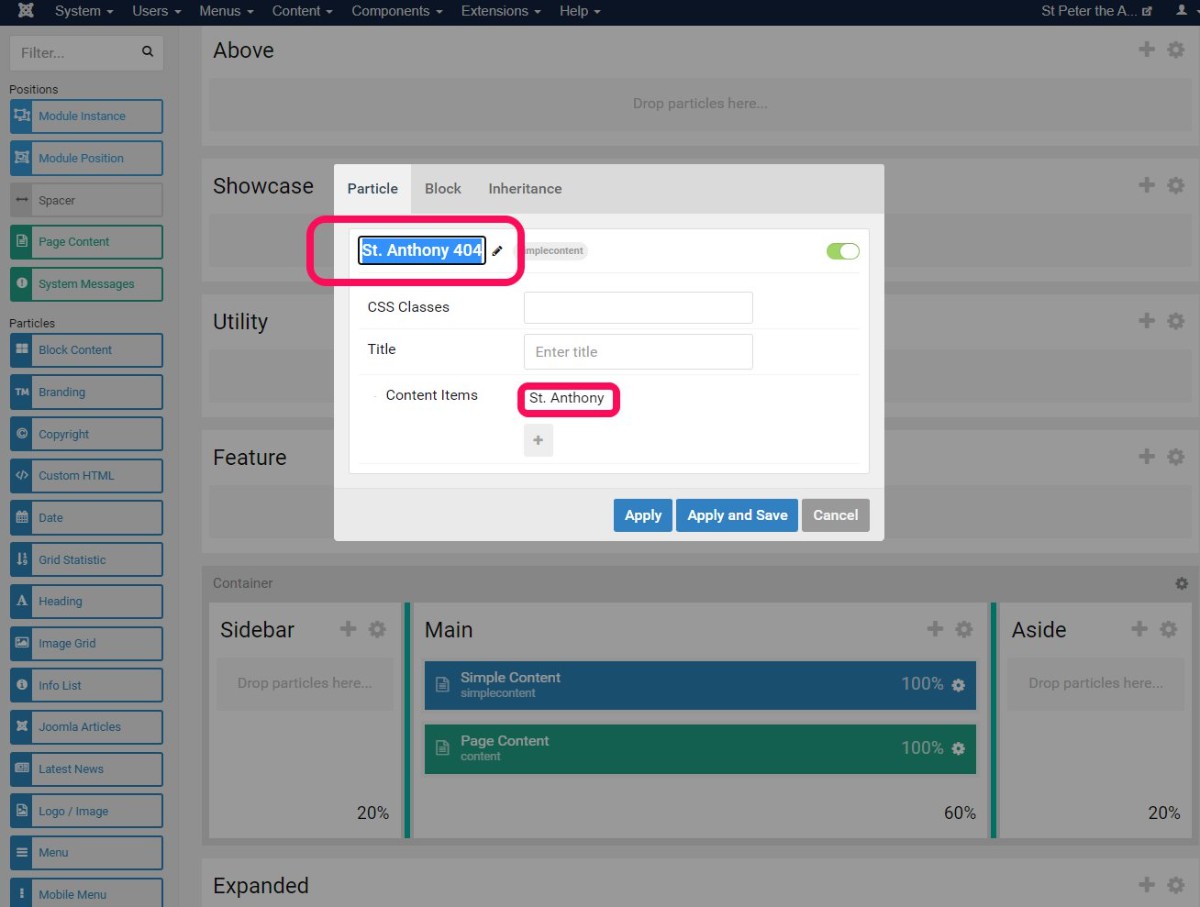
- Edit the Simple Content particle -- update the title be the 404 error noted below.
This is a gallery of error pages Jackie has taken screenshots of...

How to Add a Popup To a Website
- Details
- Jeremy Meyer

To make the pop up work add an article into the 'pop up' category. The pop up will display after 3 seconds on the homepage up to 50 times each week by default. The cookies that track how many times a user has visited will expire after 7 days. i.e. the pop up will begin to show up again (if the visit count had been reached) after the 7 days.
It is possible to change the visit limit, expiration time, and the delay.
The pop up works by using javascript to detect if there is a published article in the pop up category. It also uses custom HTML in a particle on the home outline to display a module with some css applied to it. The module is used to inject the pop up category of articles into the custom HTML. The javascript also sets cookies to keep track of how many times a user sees the pop up.
(The screenshots in this guide are not updated to match the updated code)
To add a pop up to a website:
1. Create a pop up category
The javascript will search this category for any published article and then display its content on the website.
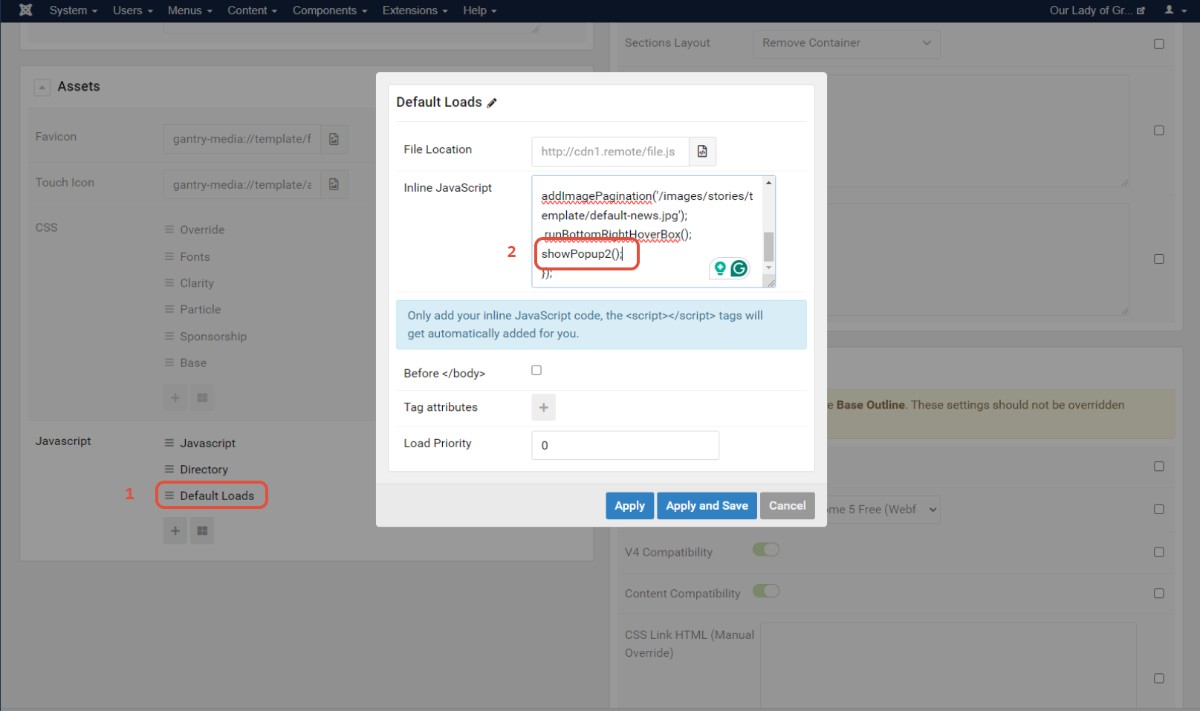
2. Add the javascript to the home outline in gantry
Scroll down to the Javascript and add the showPopup2(): function
showPopup2();
You can change the delay here by passing in 3 attributes in the function's parentheses.
You can change these 3 variables
- The number of times a person has to visit before the pop up won't show anymore
- The number of days it takes for the pop up to show again after the visit count is reached
- and the Delay in milliseconds before the popup appears on the website.
Here is an example:
showPopup2(5, 30, 5000);
This function when added to the javascript will set the popup to appear up to 5 times per user every 30 days. The popup will show after a delay of 5000ms.
You must 'pass' the variables in order.
3. Once the Javascript is added a custom particle needs to be added to the top section
Here is the code for that particle:
<div id="pop-up-overlay-2"></div>
<div id="pop-up-container-2">
<div id="popup-2">
<jdoc:include type="modules" name="pop-up" />
</div>
<button id="close-popup-button-2"><i class="fas fa-times-circle"></i></button>
</div>
This bit of code loads a module into the spot where this HTML is located:
<jdoc:include type="modules" name="pop-up" />
The name attribute needs to be set to the module position of the pop up module which we also need to create. A custom position can be made in the module to match this code.
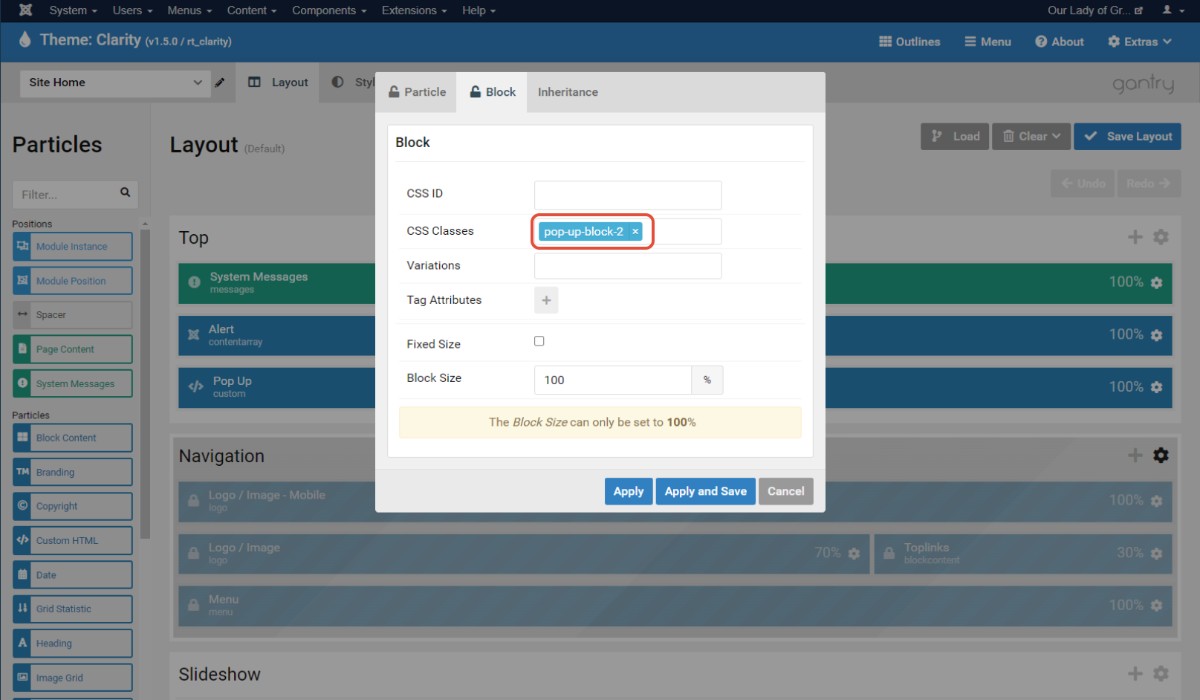
4. To hide the pop up when there is not a published article we need to add a class to the block section of the custom css particle
pop-up-block-2
5. Create the module to display the pop up category
The module type is 'place here'
Set the module to display a category
put in the category id for the pop up category which is found in the category manager
set the module position to 'pop-up'. This will be a new module position and should match the name attribute in the <jdoc> tag from earlier
set the first 5 radio buttons to 'no'
article order should be ascending
The module should be set to display on all pages, or at least the home menu item.
Once all of that is created publish an article in the pop up category and see if it works. The pop up will only show up 30 times each week before you have to clear your cookies for the website.
To clear your cookies:
open up the google inspector
go to the application tab
On the left-hand side, under the storage section, under the cookies folder, select the url
from there select the visit count cookies and delete them
You can also clear cookies through the browser settings.
Finished....
Elfsight
- Details
- Jackie Riddel

Elfsight and Social Media
Hello XXXX,
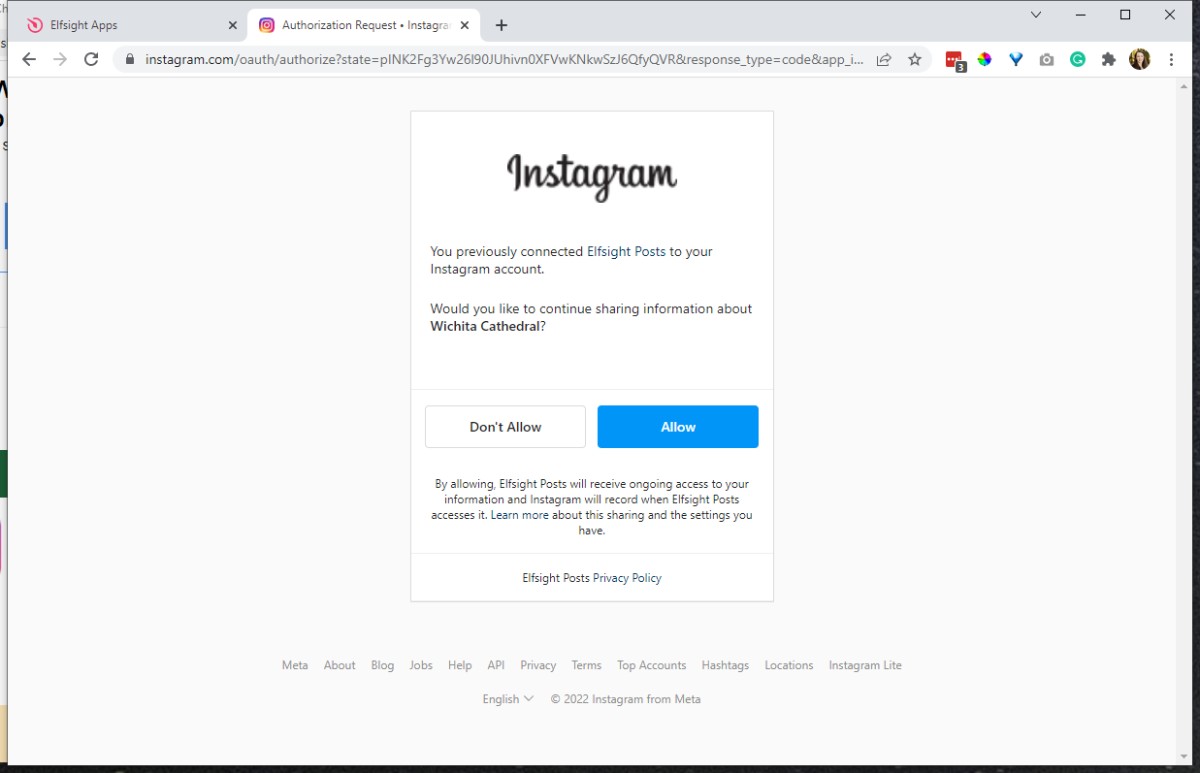
It used to be that we could make an Instagram display on the homepage by the handle of the account. However, due to permission policies, we now need permission for it to appear on the website.
Please share the following link with whoever manages the @isntagramhandle Instagram account.
XXXXXgetspecificlinkforwidgetXXXXXX (it will copy and paste white font in your email-- remove formatting)
That person will need to click the link. It will open a window similar to the one below. Please click allow. Please let us know when this has been completed. Thank you so much!
=====================================
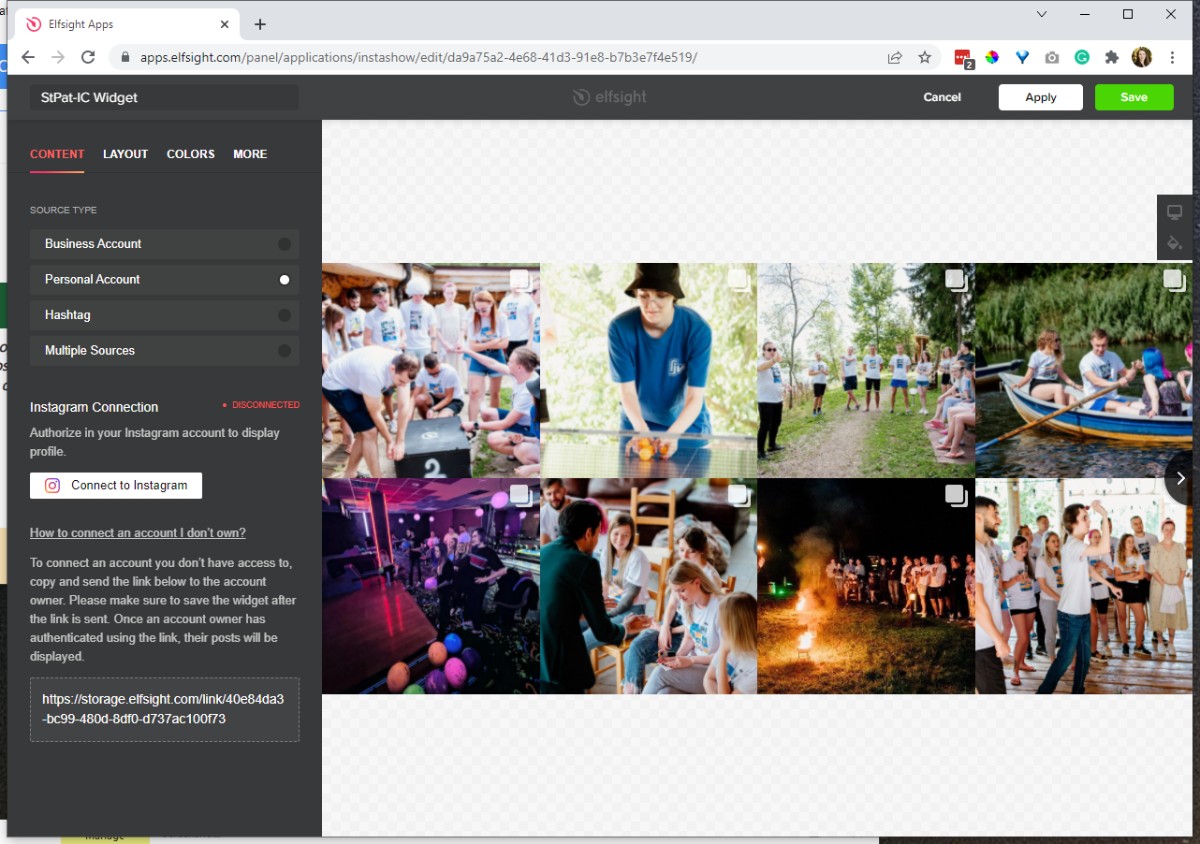
In elfsight, on the widget screen, choose personal account.
Click "How to connect to an account I don't own"
copy the URL from below. Click save on the widget before sending link to client.
Common RSS Feeds
- Details
- Tori Schippers

Copied from Trello
LINK
National Catholic Register
Added Mar 14, 2022 at 11:19 AM
LINK
Word On Fire Blog
Added Aug 24, 2021 at 9:37 AM
LINK
Word on Fire Podcast
Added Aug 24, 2021 at 9:37 AM
LINK
https://www.catholic.org/xml/rss_sofd.php
Added Jan 11, 2021 at 1:54 PM
cfm
Feeds from CatholicCulture.org
Added Jan 6, 2021 at 1:56 PM
LINK
USCCB News Feed
Added Nov 10, 2020 at 4:06 PM
LINK
EWTN News
Added Febrary 3, 2026
LINK
Catholic Saints
Added Oct 21, 2020 at 2:03 PM
LINK
USCCB Daily Readings
Added Oct 21, 2020 at 2:00 PM
LINK
Top 100 Catholic RSS Feeds
Added Mar 26, 2020 at 10:28 AM
OSV News - CatholicNews.com